
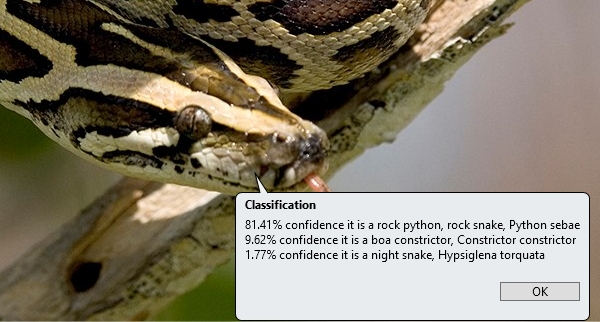
After my previous post showing image classification using UiPath and Python generated many questions about how to implement the same I decided to expand upon the theme and give a more detailed description about how to achieve this.
My starting point was thinking how I might integrate UiPath with python now that it’s integrated within the platform.
I find thinking of potential solutions and use cases just as much fun as actually making the automations and it feeds the creative mind as well as the logical.
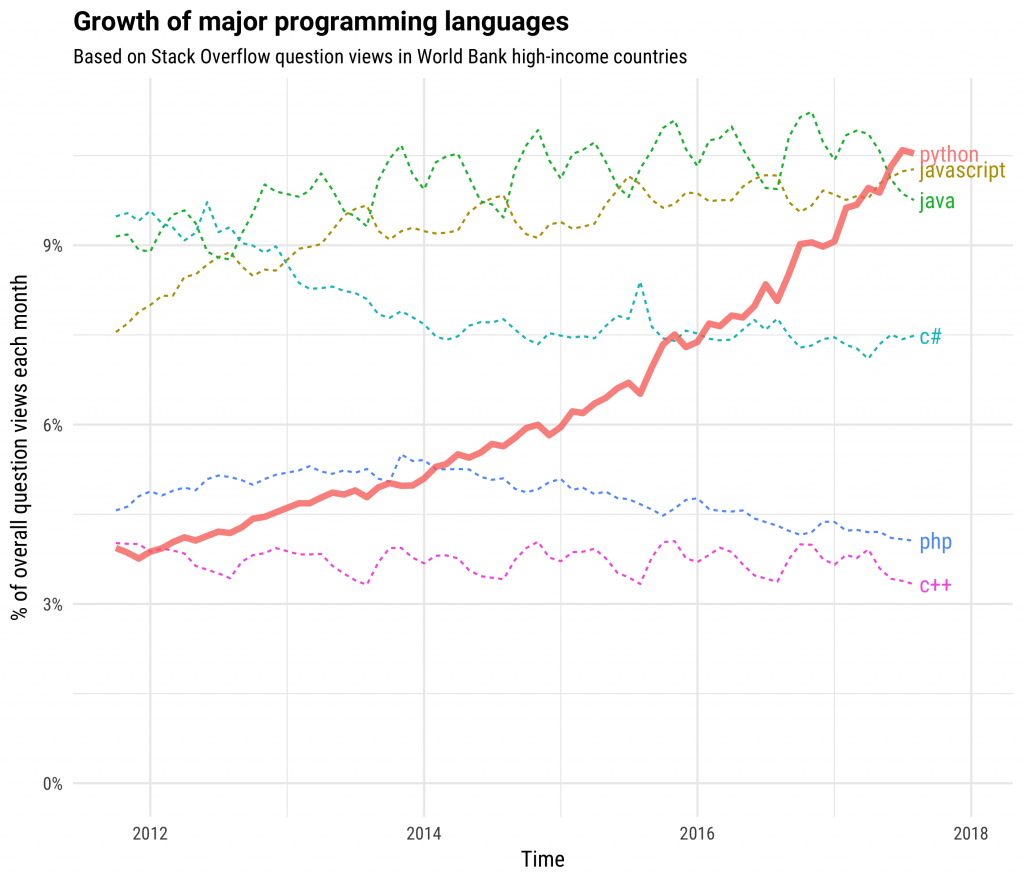
Python is also growing explosively right now and this leads to a vast array of possibilities.
To see just how python is growing see this article from Stock Overflow.
The first thing to point out is that although I used UiPath as my RPA platform this could in theory be any platform that supports python. I also use Alteryx and this could easily be integrated into an Alteryx workflow to programatically return the classifications and confidence levels.
Note that these instructions cover installation on Windows but the python and Tensorflow parts could easily be done on Mac or Linux, just follow the instructions.
Basic Requirements
Python
Obviously this won’t work without Python being installed 🙄 I used Python 3.5 but any Python 2 or 3 version should work. Download Python for free and follow the installation instructions. There’s a useful guide to the installation process at realpython.com. This is easy and will take 10 minutes to get going.
Tensorflow
This is the python library that does the heavy lifting of the image classification. Or in the words of Wikipedia:
TensorFlow is an open-source software library for dataflow programming across a range of tasks. It is a symbolic math library, and is also used for machine learning applications such as neural networks.
Wikipedia
It’s completely free to use and released by Google. I won’t go into the installation in detail since it’s well documented on the Tensorflow site, but the whole process took me another 10 minutes. Easy as 🥧
Python 3.X installs the pip package manager by default so in my case installing Tensorflow was as simple as typing the following command into the command line.
pip install --upgrade tensorflowUiPath
RPA (Robotic Process Automation) is also growing exponentially right now so it’s a great time to learn how it works and what benefits it can bring.
The RPA software market overall witnessed a growth of 92 to 97 percent in 2017 to reach US$480 million to $510 million. The market is expected to grow between 75 and 90 percent annually up to 2019.
If you don’t already have RPA software and want to integrate into an automated solution you can download and use the community version of UiPath for free (Windows only).
UiPath is very powerful and yet easy to use, but apart from the technology a major advantage they have is the large and growing community so solutions are often posted to their forums. On top of that they have free training available online. What’s not to like?
Download the Tensorflow Models
Let’s get into the details now starting with downloading the models we will use.
If you use git you can clone the Tensorflow models repository using this link; https://github.com/tensorflow/models
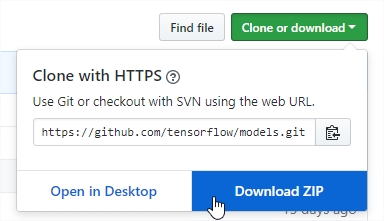
Otherwise you can use a browser and navigate to the above page and then download the models as a zip file using the link in the top right corner.
Save the zip file to your computer and unzip somewhere on your C: drive. The location isn’t important as long a you know where it is.
Download the Pre-trained Model
This can be done in one of two ways, either:
Method 1
Find the location of the unzipped models file from the previous step and go into the following directory (in my case the root directory is called models-master), models-master > tutorials > image > imagenet
Once there open a command prompt and run the python file called classify_image.py
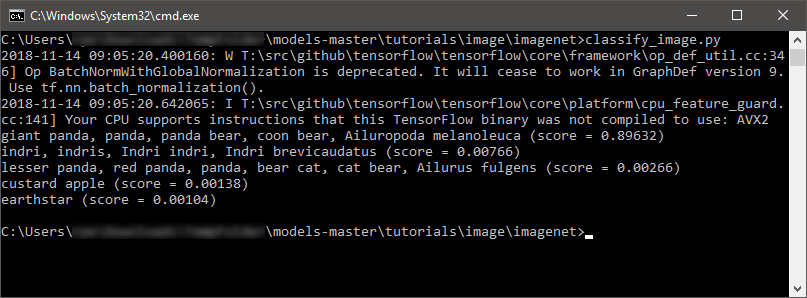
If all goes to plan this downloads the pre-trained model to your C drive and saves it to C:\tmp\imagenet, it also runs the classifier on a default image in the downloaded folder. As you can probably work out the image is of a panda 🙂
giant panda, panda, panda bear, coon bear, Ailuropoda melanoleuca (score = 0.89632)
indri, indris, Indri indri, Indri brevicaudatus (score = 0.00766)
lesser panda, red panda, panda, bear cat, cat bear, Ailurus fulgens (score = 0.00266)
custard apple (score = 0.00138)
earthstar (score = 0.00104)

If you got this far, well done, you’ve already done image classification using python and Tensorflow!
If you get warning in the output, as I did, you can safely ignore these assuming the classifier still produces the output. These are purely because we are using the default Tensorflow library that is designed to work across as many CPUs as possible so does not optimise for any CPU extensions.
To fix these you would need to compile Tensorflow from source which is out of scope for this tutorial (see here for more info, https://stackoverflow.com/questions/47068709/your-cpu-supports-instructions-that-this-tensorflow-binary-was-not-compiled-to-u)
Method 2
Alternatively you can take a shortcut and download the pre-trained model directly from here, http://download.tensorflow.org/models/image/imagenet/inception-2015-12-05.tgz
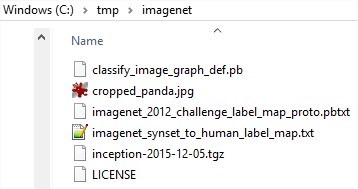
Extract the files (you’ll need something like 7-zip for that) and save them to C:\tmp\imagenet so it looks like this:
Modify the Image Classifier for Automation
The classify_image.py python script could easily be used directly with python but as it stands the script only prints the data to the command line and does not return any data from the function.
We could just change the script to write the output to a text file which UiPath could read, but it’s much cleaner and more efficient if we alter the code to return a list from the classifier function which can be converted into a .NET object in UiPath.
This also gives us the advantage that we can load the script just once into UiPath and then call the classifier function each time we need to classify an image saving considerable time and resources.
The modified python file (‘robot_classify_image.py‘) can be downloaded from my github repository, https://github.com/bobpeers/uipath, and placed somewhere where it can be called from your automation workflow.
To test the file works you can call it from a command line as follows.
C:\>robot_classify_image.py <full_path_to_image> <number_of_predictions>For example this will return three predictions on the bike image.
C:\>robot_classify_image.py "C:\work\UiPath\Images\images\bike.jpg" 3By default the script will not print the results to the console but if you wish to see them simply uncomment the print() line in the script:
for node_id in top_k:
    human_string = node_lookup.id_to_string(node_id)
    score = predictions[node_id]
    #enable print for testing from command line
    #print('%s (score = %.5f)' % (human_string, score))
    returnValue.append("{0:.2%};{1}\n".format(score,human_string))
Note that if you saved the pre-trained model somewhere other than C:\tmp\imagenet you can edit the python to point to the saved location by replacing all the instances of ‘/tmp/imagenet/‘ with your path (be sure to keep the forward slashes).
UiPath Workflow
Most of the hard work is now done. It’s only left for us to integrate this into a UiPath workflow which is simple 😊
Use a Python Scope
All the python activities must be contained inside a Python Scope container.
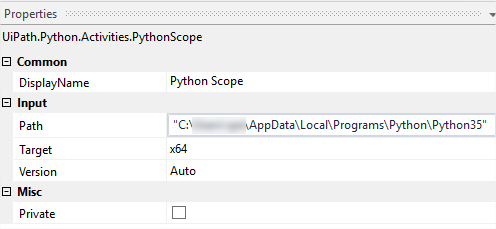
Set the path to your installation path and target to x64 for 64 bit systems or x86 for 32 bit. Leaving the version as auto will auto-detect your version.
Load the python script
First we load the python script into UiPath using a Load Python Script activity.

Setting the result of this activity to a variable, in my case called pyScript.
Invoke the Python Method
Next we use the Invoke Python Method activity that will actually run the classification method.
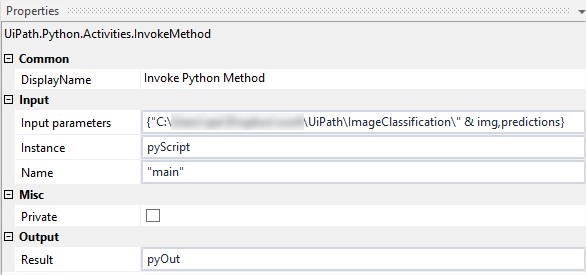
In the Invoke Python Method activity enter the name of the function to call (‘main‘) along with the script object from above as ‘Instance’.
The function ‘main’ expects two arguments (‘Input Parameters’), the full path to the image file and the number of predictions required, sent as an array using variables in my case.
The function returns a Python Object called pyOut in my case.
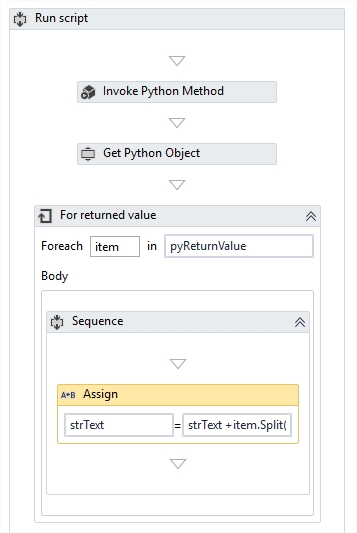
Get Return Values
The Get Python Object takes the returned value (pyOut) from the previous activity and converts it into an array of strings (which is the return value from python)
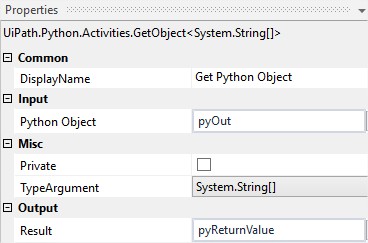
We can then loop through the array and extract each line from the prediction and use for further processing or display on a callout as I did in the video.
All finished, take a coffee on me 😅
Summary
Once the basics are set up, using the classifier is extremely easy and returns values very quickly. As you look at more images you’ll also realise that sometimes the model is not certain on the results so make sure you check the confidence level before continuing processing.
My suggestion would be to automate anything over 80-90%, depending on the use case of course, and putting everything else aside for manual handling.
The classifier uses about 1000 classes to identify objects but you could always retrain the classifier on your own images. The Tensorflow documents are here, https://www.tensorflow.org/hub/tutorials/image_retraining if you want a challenge.
Have fun 🤖💪