
Now I have two Raspberry Pis running, one as a Bitcoin full node and the other mostly used as a dev/experimentation machine I decided it’s time to put the dev machine to some use.
I’d also like to learn more about IoT (Internet of Things) and how they are wired together and communicate so this is a great opportunity to ‘Learn by Doing’.
To this end I’ve started to experiment with the MQTT messaging protocol that is commonly used for IoT devices.
To start, what is MQTT?
MQTT (Message Queuing Telemetry Transport) is an ISO standard, lightweight, publish-subscribe network protocol that transports messages between devices.
MQTT on Wikipedia
This allows us to very easily send sensor data between devices without having to invent the communication medium ourselves. Most IoT gateways support MQTT out of the box and it’s widely supported across many programming languages (list here).
As a test I’ll create a Node-RED flow on my Raspberry Pi that will publish (send) messages to a local MQTT server, these messages will then be ‘read’ by a python script running on my Windows laptop. I’ll also add a flow where the python script on Windows publishes messages that are then read by the Node-RED flow.
Node-RED Flow
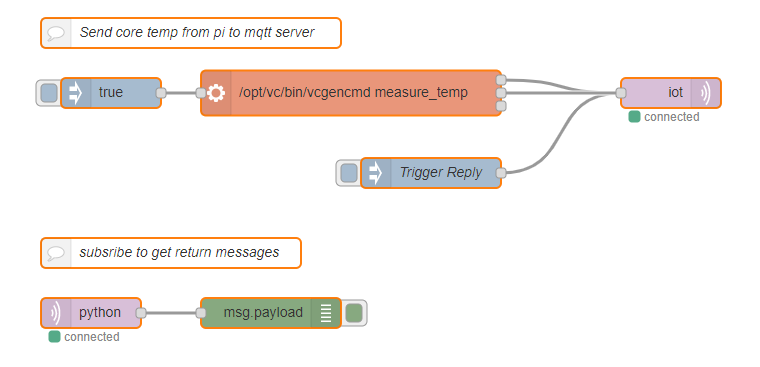
MQTT in and out nodes are included as part of the standard installation on Node-RED so creating a flow is trivially easy. All the MQTT part is contained in a single node while the rest of the flow is just creating the message to send.
Publish Flow
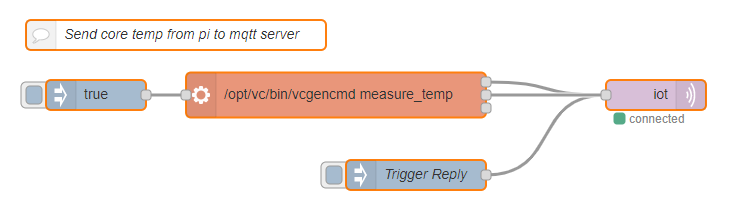
The inject nodes are just to manually trigger the flow. The true trigger causes the exec node to execute a command on the Raspberry Pi, in this case it gets the system temperature. This is then published to the MQTT server in the ‘iot‘ topic.
The command to get the system temperature on a Raspberry Pi is shown here.
$ /opt/vc/bin/vcgencmd measure_tempTopics in MQTT are just ways to keep different messages together, if you publish to a specific topic then other clients subscribed to the topic will receive the messages.
Subscribe Flow
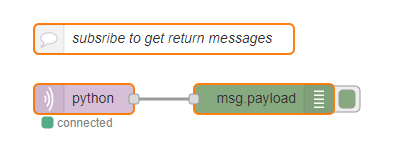
The lower two nodes are used to subscribe to a topic I’ve called ‘python‘. This is triggered when the python script publishes to the topic and the message will be outputted to the debug console in Node-RED.
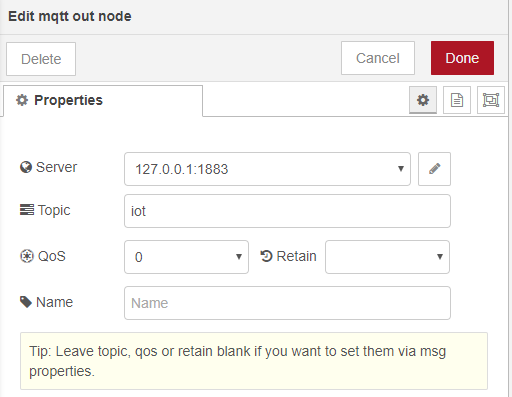
Configuring the MQTT Nodes
By default the MQTT nodes use a local server on port 1883 that is already set up for you. Unless you want to use your own server or a remote server just leave these as-is. The topic is entirely up to you, just make sure you use the same topic in the client used to read the messages.
MQTT Python Script
For the python client running on my laptop I’ll use the Eclipse Paho library. To install use:
pip install paho-mqttThe full script looks like this.
import paho.mqtt.client as mqtt
import os

# The callback for when the client receives a CONNACK response from the server.
def on_connect(client, userdata, flags, rc):
    print("Connected with result code "+str(rc))

    # Subscribing in on_connect() means that if we lose the connection and
    # reconnect then subscriptions will be renewed.
    client.subscribe("iot")

# The callback for when a PUBLISH message is received from the server.
def on_message(client, userdata, msg):
    print("Topic: {} / Message: {}".format(msg.topic,str(msg.payload.decode("UTF-8"))))
    if(msg.payload.decode("UTF-8") == "Reply"):
        client.publish("python", os.environ.get('OS',''))

client = mqtt.Client()
client.on_connect = on_connect
client.on_message = on_message

# Use the IP address of your MQTT server here
SERVER_IP_ADDRESS = "0.0.0.0"
client.connect(SERVER_IP_ADDRESS, 1883, 60)

# Blocking call that processes network traffic, dispatches callbacks and
# handles reconnecting.
# Other loop*() functions are available that give a threaded interface and a
# manual interface.
client.loop_forever()
The code is well commented but essentially it creates a connection to the MQTT server (created by the Node-RED flow on my Pi). Replace the IP address with your local server or use 127.0.0.1 if the script runs on the same computer as the server.
The script then waits for messages in the ‘iot‘ topic and when received it prints the message to the console. If the message is ‘Reply’ then the script also publishes a message (the Windows OS version) to the ‘python‘ topic which will be picked up by the Node-RED flow and displayed there.
Putting it Together
To start sending and receiving messages first deploy the Node-RED flow and then start the python script. Running the python script returns this showing the script is now waiting for messages.
>python mqtt.py
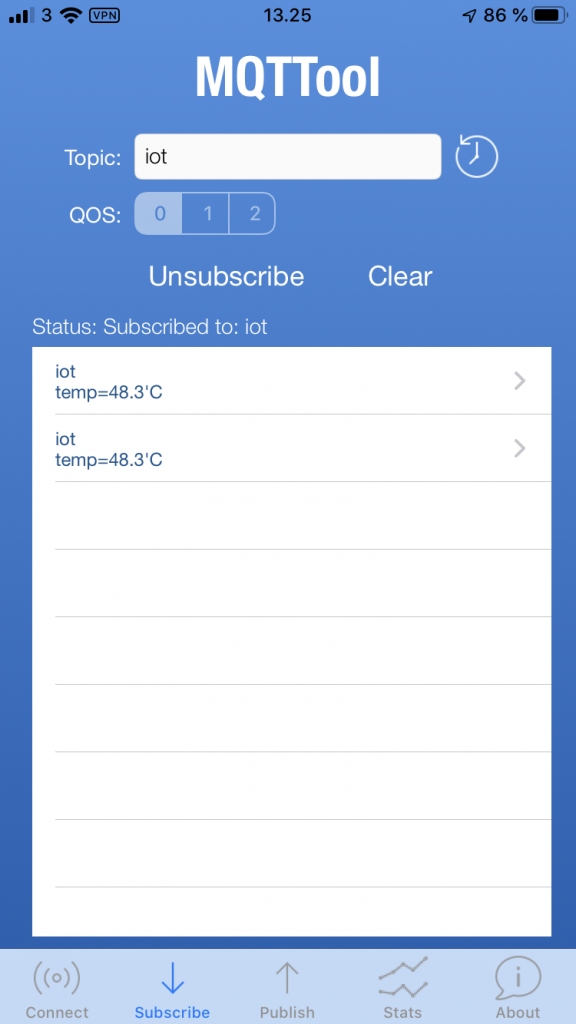
Connected with result code 0Injecting the ‘true‘ node will query the Pi for the system temp and send this to the ‘iot‘ topic on the MQTT server which the python script will pick up and display as shown below. Here I ran the flow four times so we get four messages with temperatures displayed in python on my laptop.
Topic: iot / Message: temp=48.3'C
Topic: iot / Message: temp=48.3'C
Topic: iot / Message: temp=48.9'C
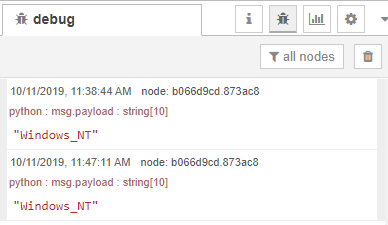
Topic: iot / Message: temp=48.3'CIf I now send the ‘Reply‘ message from Node-RED we see this in python.
Topic: iot / Message: ReplyIn Node-RED we see a debug message with the message sent from python to the ‘python‘ topic we subscribed to in Node-RED (“Windows_NT”).
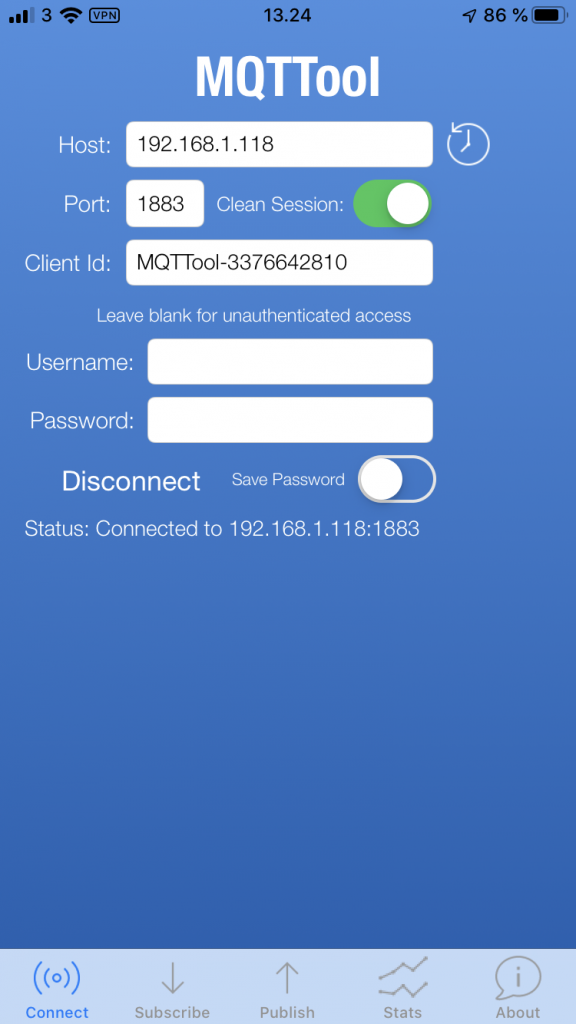
Testing from iOS
In the app store there are quite a few MQTT clients available. I tried a few but MQTTool was the most reliable for me. It allows you to connect to a server and both publish and subscribe to topics. Just connect to your MQTT server and test!
Next Steps
This was a trivial example of using MQTT to send and receive messages but the next plan is to extend this with sensor data that can be send to Node-RED running on a virtual server.
This way I can securely make sensor data available form the internet as well as choosing to store the data in a database or cloud storage service.