Sharing files securely is still a challenge. I’ve tried every combination of AirDrop, WeTransfer, Dropbox, email and numerous other but it’s still not as smooth as I’d like.
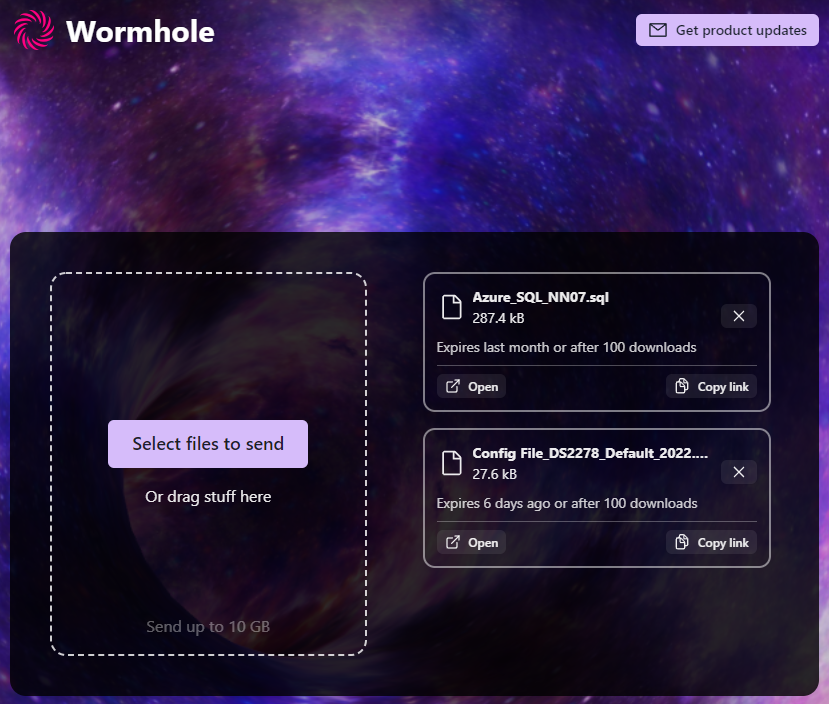
Then I found Wormhole. No login required, fully encrypted and works simply on any device. Just open the page, drop in your files and share the link. If you’re sharing a file between your own devices you can also scan the QR code to easily get the file from a phone.
You can also delete your files without having an account, unlike WeTransfer.
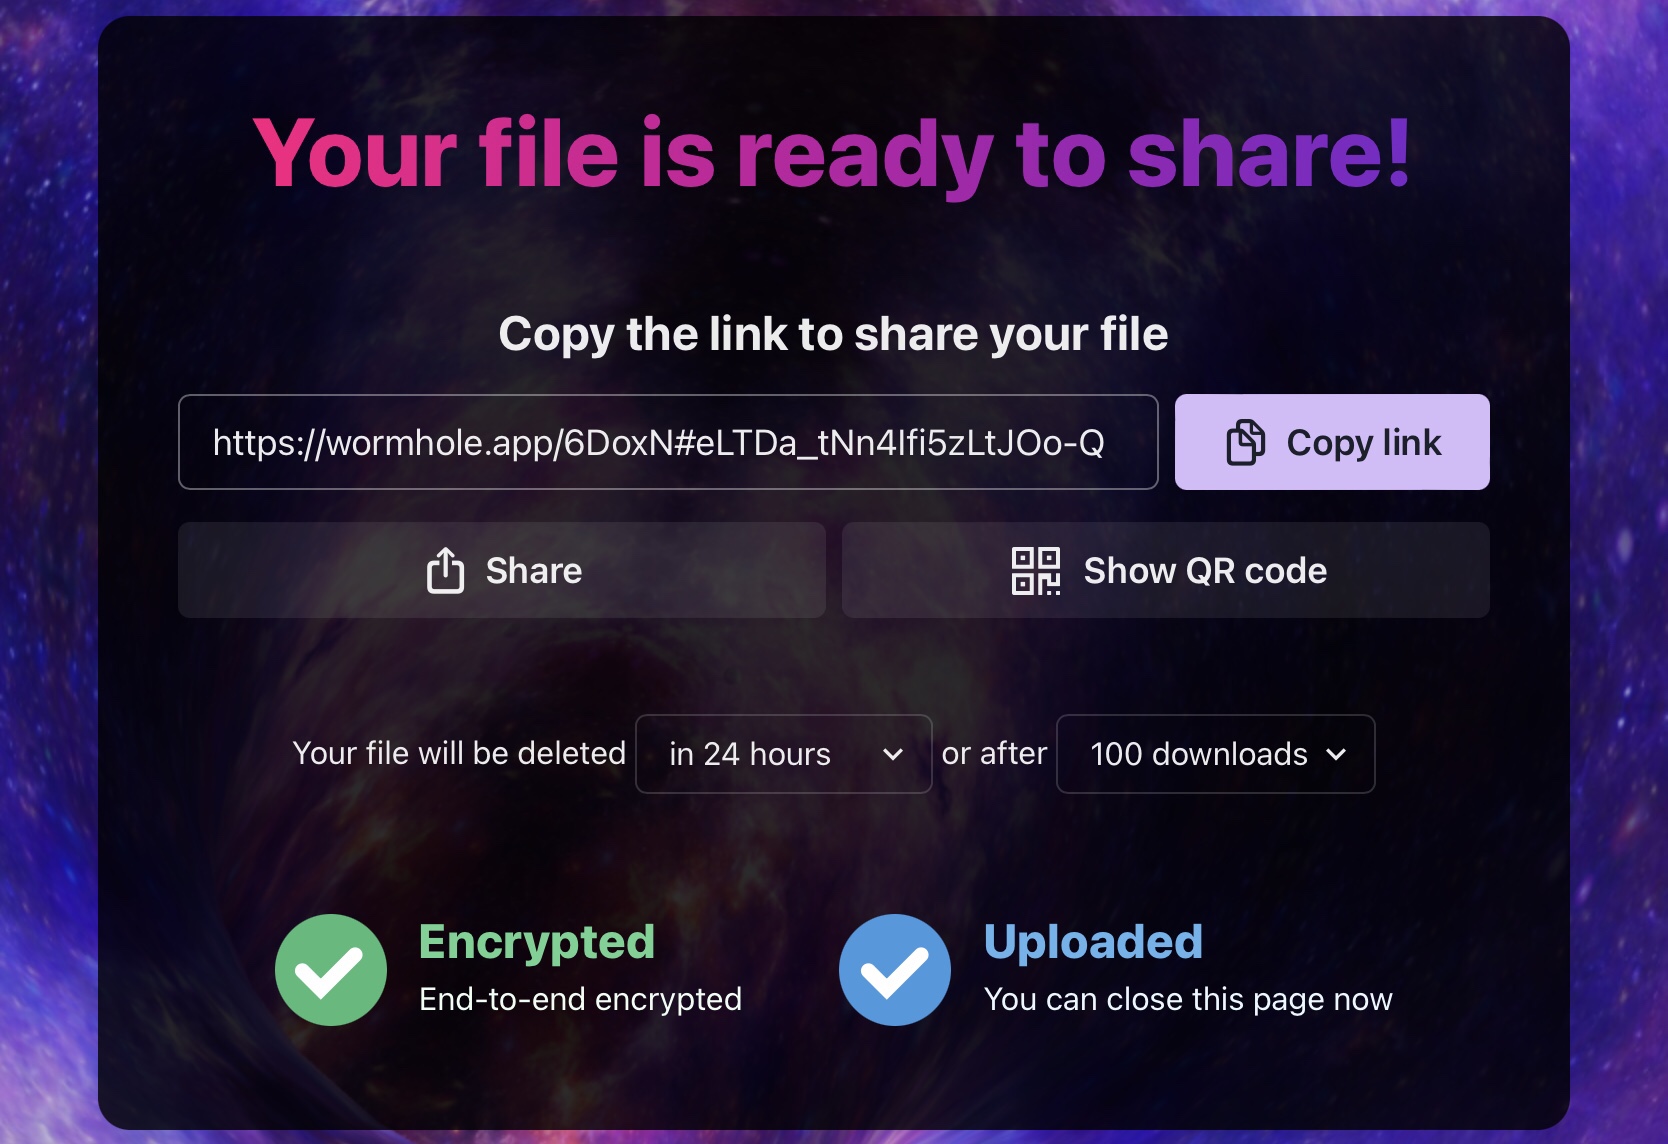
Then drag the files to share into the page or locate them with the file browser. Once done you are shown the link to the files and optionally you can show a QR code making it really easy to share from a Windows computer to an iPhone for example.
Uploaded file with share options
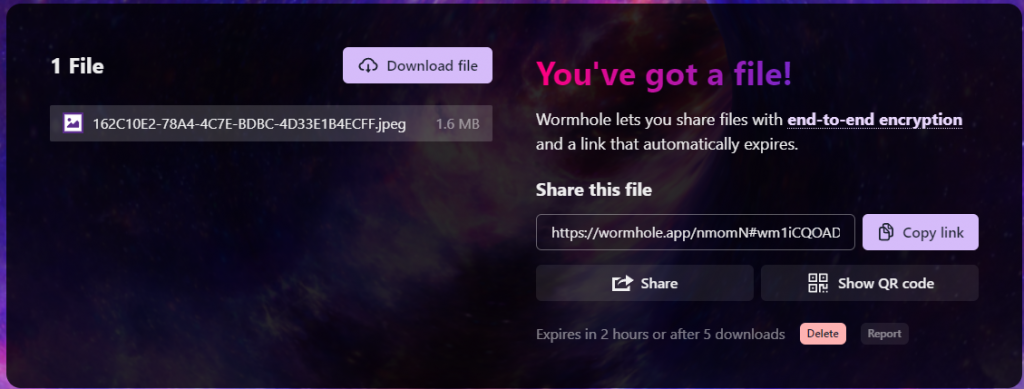
If you transfer a large file there’s no need to wait until it completely uploads. As long as you keep the uploading session open you can start to download the file immediately on another device and the file will stream between devices.
Download files
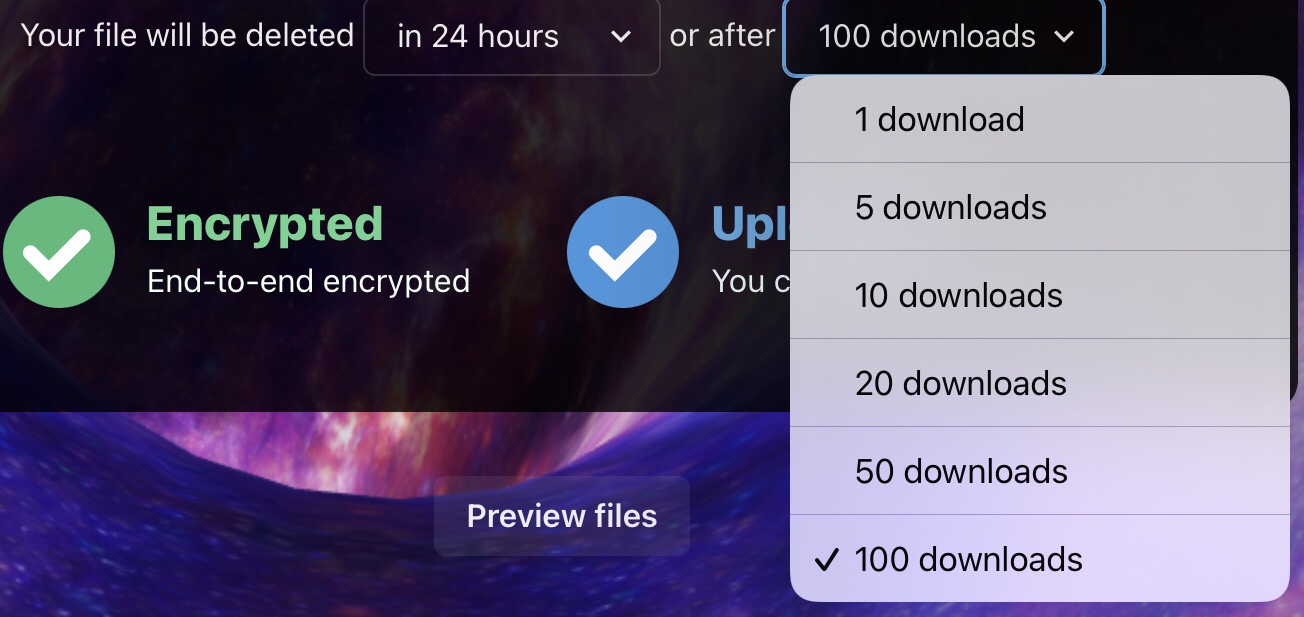
You can also set the files to debate after a set time or after a certain number of downloads.
What’s the maximum file size? For files up to 5 GB, Wormhole stores your files on our servers for 24 hours.
For files larger than 5 GB, Wormhole uses peer-to-peer transfer to send your files directly from your browser to the recipient. So you’ll need to keep the page open until the recipient downloads the files.
https://wormhole.app/faq
Is Wormhole secure? Every design decision in Wormhole begins with the safety and privacy of your data in mind. We can’t read your files, and no one else can either. Privacy isn’t an optional mode — it’s just the way that Wormhole works.
Wormhole uses end-to-end encryption to protect your files so they can never be shared or viewed by anyone but you and the intended recipients. Files are permanently deleted from the server after 24 hours. Wormhole encrypts all files with 128-bit AES-GCM encryption before they leave the browser. You can read more about the security design to learn more.
A standard installation of KNIME does not come with a built in Geocoder node but it’s very easy to either install one or make your own.
KNIME has a page dedicated to Geo Nodes (https://www.knime.com/book/geo-nodes) using the Palladian Community Nodes that supports both MapQuest and Google.
But if you want to roll your own using another geocoding service it’s very easy.
OpenCage Geocoding API
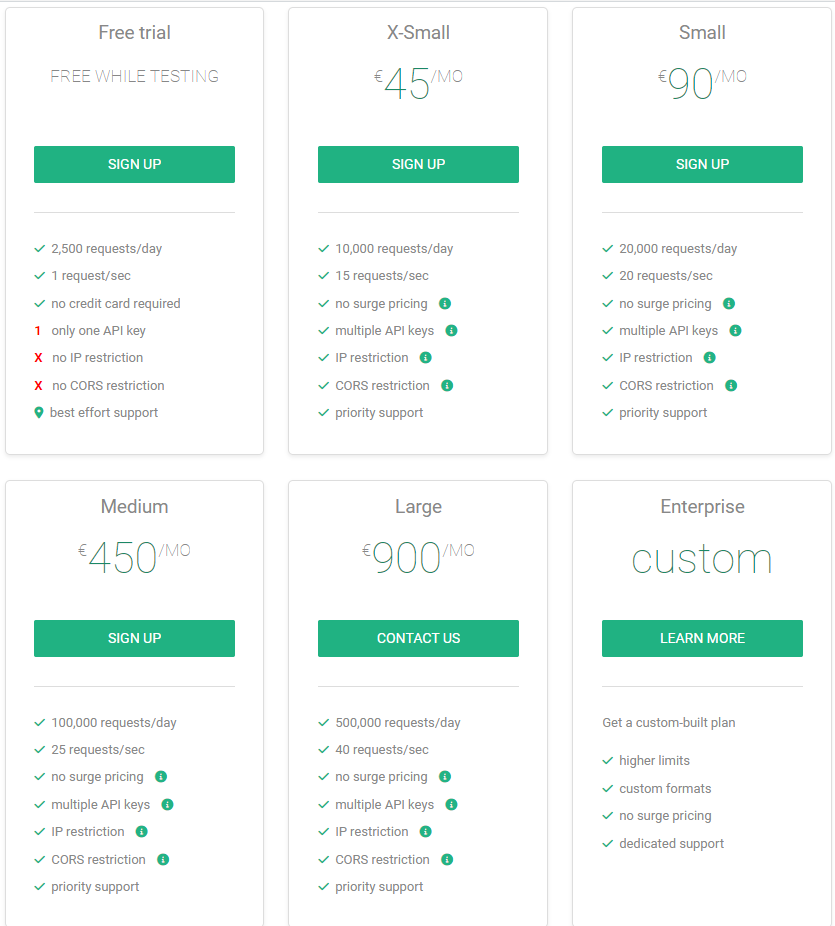
OpenCage is a well known Geocoding API that has very reasonable pricing allowing you to test the service for free and paid plans starting at €45 per month for 10,000 requests per day. First you should sign up to the service and get an API key for the free trial plan.
OpenCage Pricing Plans
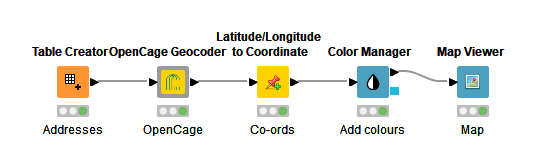
Using my OpenCage component you can create a simple workflow as shown below. This example shown how easy it is to feed addresses, geocode and then present the results on a map colour coded by location.
OpenCage Geocoding workflow
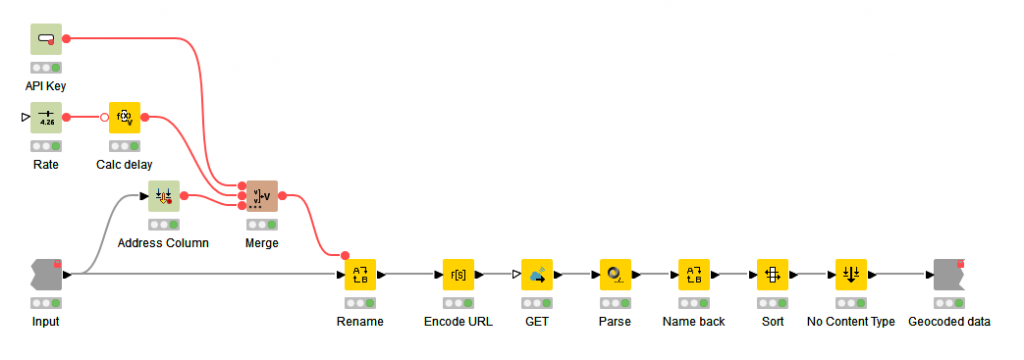
Opening the OpenCage component shows the details. Essentially it’s three configuration nodes used for the input, a GET Request to connect to the OpenCage API and parsing and cleaning of the return data.
OpenCage Component
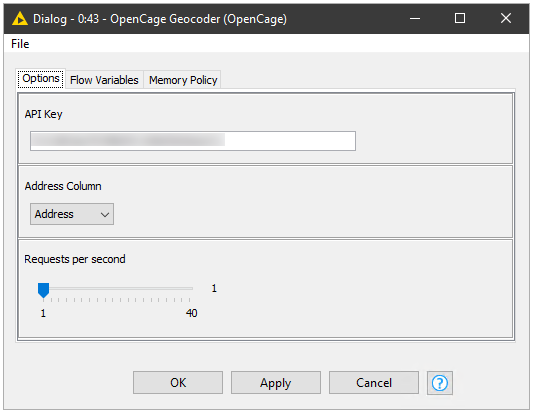
Node Configuration
The node has a few configuration options:
API Key provided by OpenCage
Field that contains the address information to Geocode
Rate limit option in requests per second (dependant on your plan)
Crunch Fitness, 555 12th Street Northwest, Washington, DC 20004, United States of America
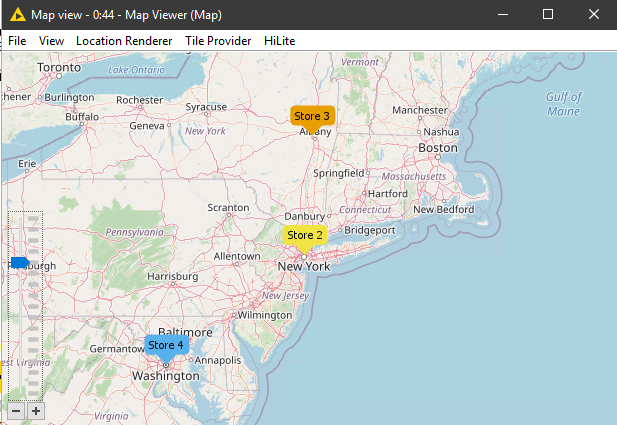
Using the Latitude/Longitude to Coordinate (from Palladian), Colour Manager and Map Renderer (from Palladian) it’s easy to plot the co-ordinates on a map by colour and add labels.
Map Viewer
Creating components like this is a great way to wrap a complex process into a simple to use and re-usable node.
This guide will show you how to use a recursive loop to download data from an API. I my case I’ll be using a GraphQL API but the approach would work in a similar way for any other REST API. This guide will not go into the details about the workings of GraphQL as those guides are readily available online.
Paginated APIs
If the API you are accessing has a large number of records to return they will often return data in batches, called pages, and you need to move forward through the data using a method called pagination. The reason for this is to reduce server load, so instead of returning a massive 100,000 record JSON object you get the data in smaller chunks.
Essentially you call the API requesting say 200 records and you get 200 back, you then request 200 more and so on until there are no more records returned. A typical request looks like below.
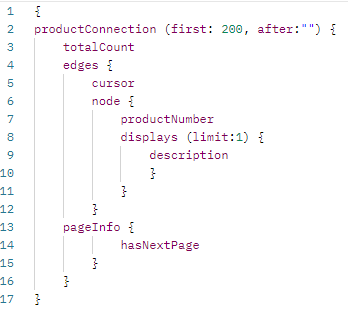
Typical GraphQL query with pagination
GraphQL API
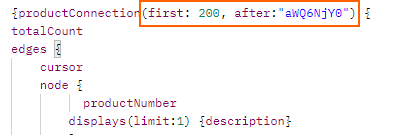
Using GraphQLwe use a connection to paginate through the records using cursor-based pagination. In this case I’ll be downloading product data from an eCommerce website using a ProductConnection. The query gets 200 product numbers and descriptions per request.
The important parts of the request object is (first: 200,after:””). This requests the first 200 records using a cursor which is initially empty, hence the blank string (escaped with backslashes which KNIME requires, if you test in Postman for example you don’t need the backslashes).
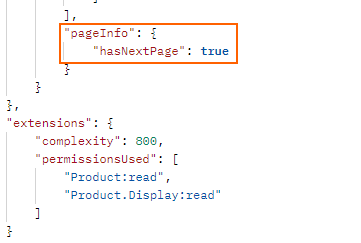
The hasNextPage object will be returned with the value as either false, if there are no more records to retrieve or true if there are more records.
The cursor object will also be populated with a string which is a pointer to the record returned. To get the next records we need to find the last cursor returned and on the next iteration ask for the next 200 records after this cursor.
Now we need to put this together into a KNIME workflow.
The KNIME Workflow
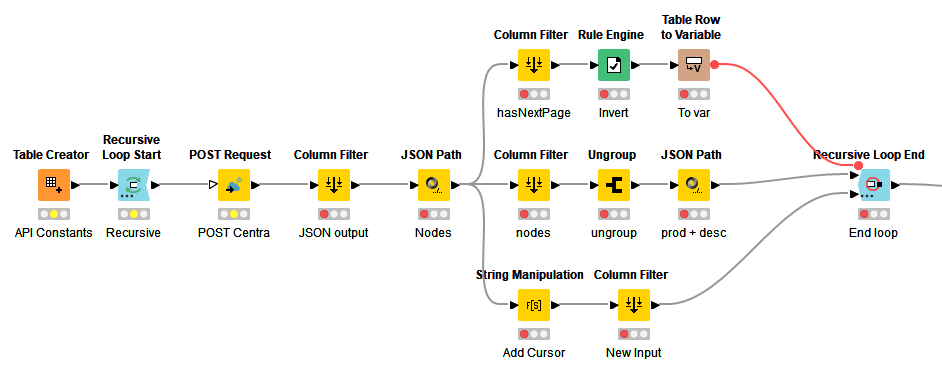
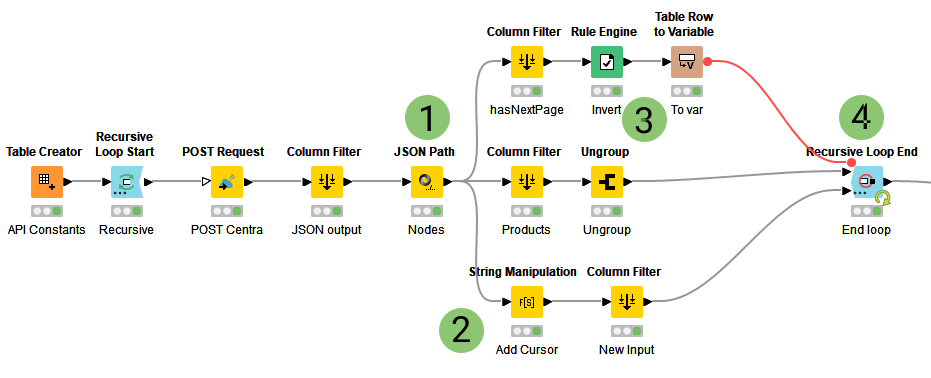
To download the data using KNIME we need to use a combination of the Recursive Loop node and POST Request to send the query to the GraphQL endpoint. The finished workflow is shown below.
KNIME Recursive Loop
The elements of the workflow are:
Input the query string (plus anything else required for the POST request, URL, authentication etc.)
Start the recursive part of the flow
POST the query string to the Graph QL endpoint
Parse the response to collect the product data (middle branch) to feed into the Loop end
Top Branch
Use a Column Filter to isolate the hasNextPage value
Convert hasNextPage from text to a boolean and invert the value
Convert the row to a variable and feed into the loop end.
Recursive loops can be set to stop using a variable that should be true when you want it to stop. The value hasNextPage returns true when there are more pages so we need to invert it so when it returns false (no more pages) the variable becomes true and we stop the loop.
Bottom Branch
Using a String Manipulation node to replace the after:”” part of the query with the extracted cursor value so it reads something like after:”YOURCURSOR”. I use regexReplace for this.
Filter the columns and feed back into the recursion port of the End loop node
The GraphQL Data
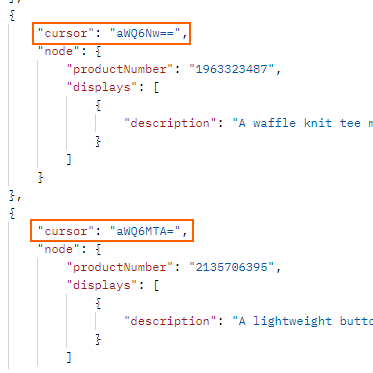
On the first iteration since we have no cursor we ask for the first 200 records after an empty cursor (after:””). We parse the JSON payload returned and get the last cursor which in our case will be the 200th cursor value. We get a cursor for every record returned and it usually looks like a random string something like “AeghYtn=“.
One cursor for each record
Using this cursor we place this into the current query object so the next request is for records after:“AeghYtn=“.
Get more records using the last cursor as the starting point
At the same time we check to see if there are more pages to be returned. If not the loop will end otherwise another iteration will run using the new query string in the next POST request.
Object to determine if we have more pages
This continues until there are no more records to be read.
The KNIME Details
I haven’t shown all the nodes in details as many are standard to many flows but I’ve highlighted the ones critical to a recursive loop using GraphQL APIs and numbered them below.
Numbered details described below
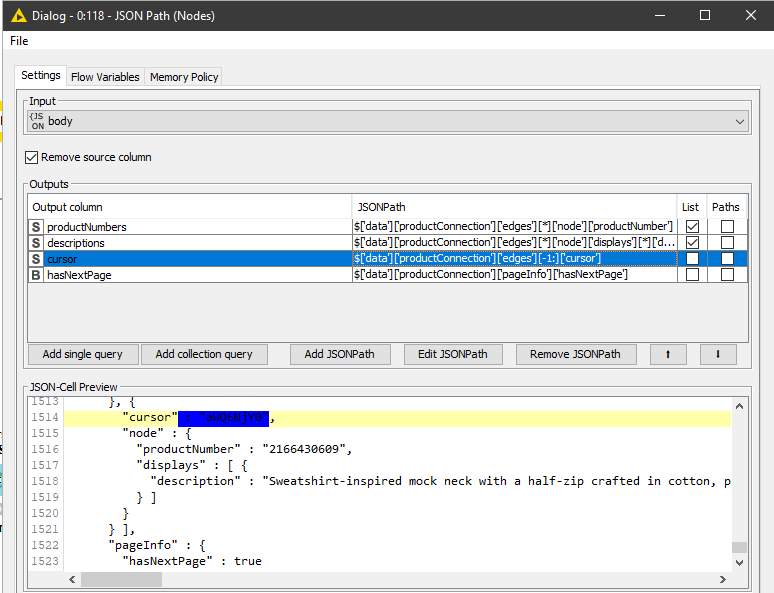
[1] JSON Path
As well as parsing the actual data returned we get the cursor and the next page value. A trick to get the last cursor is to use the following syntax.
Using [-1:] to access the last cursor element makes the node dynamic so it we change the workflow to get 500 records at once it will still work. If we had used [199] (remember arrays are zero indexed) to get the last cursor this would only work when we request 200 records.
The path to get the hasNextPage value is much simpler as the element only exists once.
JSON paths to return last cursor
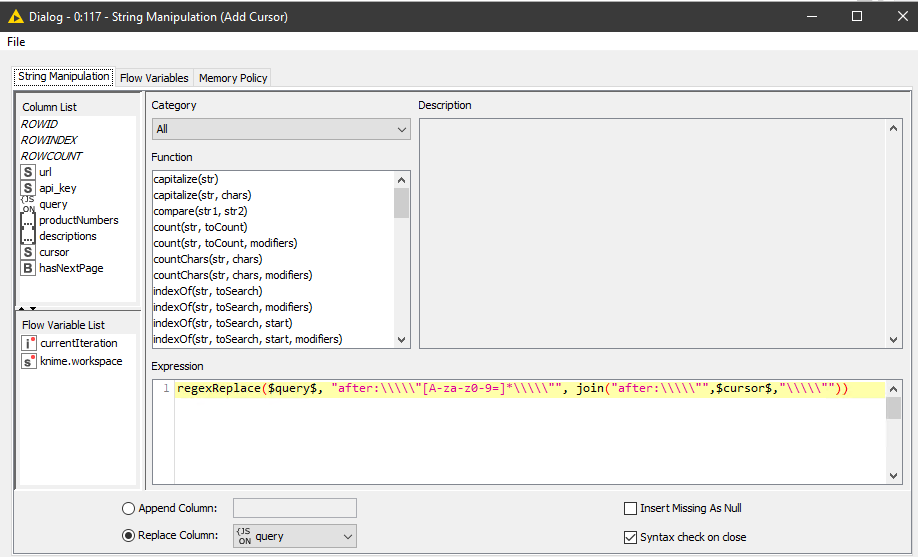
[2] String Manipulation
Here we modify the query string for the next iteration so instead of an empty curser we populate the query with the last cursor returned from the JSON Path node.
Essentially we need to replace the string in quotation marks used in the after:”” clause. To do this I use a regexReplace function as show below.
This of course needs to also work on the next iteration when the after:”” part is not an empty string but will contain the cursor from the previous iteration. In my case all cursors contain either letters, numbers or the equals operator so I test for [A-za-z0-9=].
regexReplace on query string
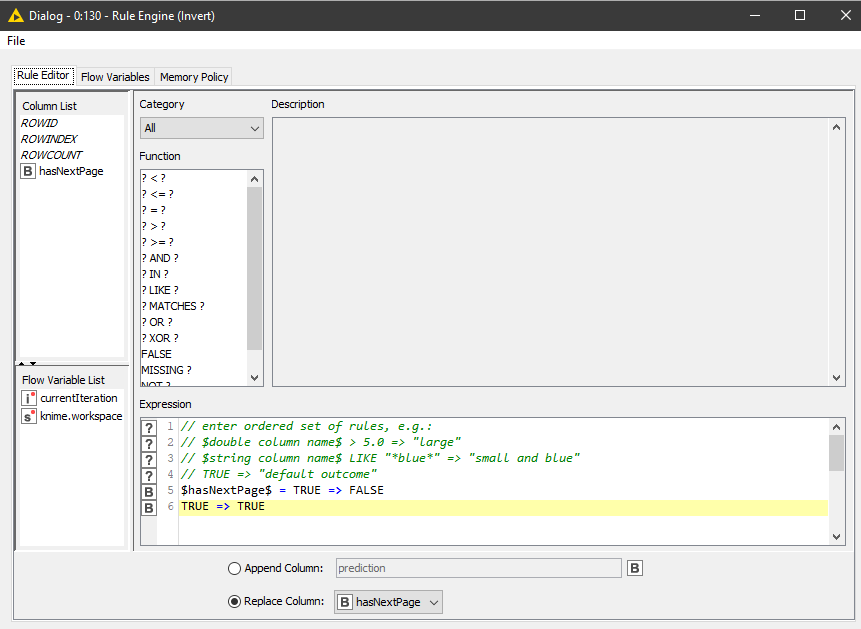
[3] Rule Engine
This is part of the flow to control the iterations. We invert the value of hasNextPage so when there are no more pages it becomes true and the iteration loop stops.
Invert hasNextPage value
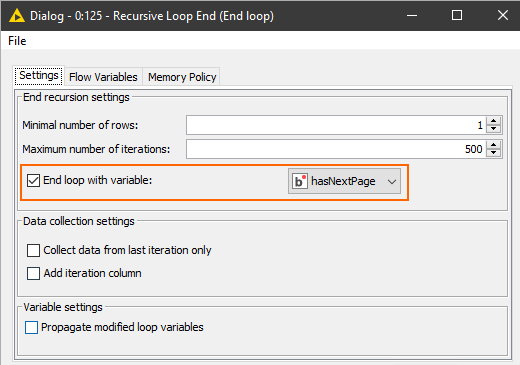
[4] Recursive Loop End
To end the recursion we use the variable we created from hasNextPage. All the data from each iteration will now be collected so you can continue to process the data downstream.
End loop when hasNextPage (inverted) is true
Summary
Recursive loops can be tricky to get working but once you understand the basics of recursion and how KNIME loops work they are a very useful tool and can be used in a wide range of applications where you are required to download large amounts of data via APIs.
The documentation for the Recursive loop can be found on the KNIME Hub.
How to output to multiple files with dynamic contents and unique names using KNIME without hardcoding filters and using multiple branches? Loops, you need loops.
Coming from Alteryx that doesn’t have loops (you are required to use macros to achieve the same effect) it took me a while to understand KNIME loops. But once mastered they give you lots of flexibility and are much easier to understand and debug than macros since they follow the normal design rules and are visible at all times on the canvas.
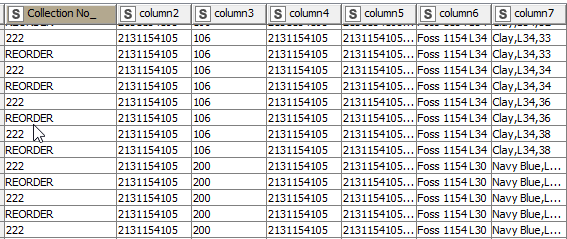
An Example Dataset
Say you have a dataset as shown below and you want to output the data to separate files with one Collection No_ per file. This dataset also changes so next time there will be new values in Collection No_ but you still want the export to work.
How can you do this using KNIME?
The Loop Solution
The solution is to use a Group Loop where we create a loop that will run once per Collection No_ group. This means that for each run of the loop we will only see records for one Collection No_ inside the loop. One the next iteration we’ll see the next Collection No_ and so on until the full dataset is processed.
In the loop we do the following steps:
Use Group Loop Start set on Collection No_,
Get the a single row with Collection No_ using a GroupBy node (to be used for the output file name)
Create a dynamic string to use as the destination path for the file using the Collection No_ and String Manipulation node
Convert the string to a Path using String to Path
Make the Path column into a variable using Table Column to Variable
Feed the loop data into a CSV Writer node and use the Path variable to change the filename dynamically
Connect the Loop End to the CSV Writer and Group Loop Start
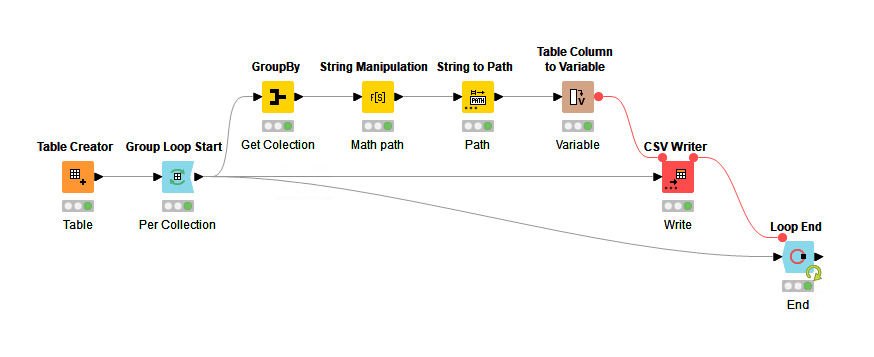
The final workflow looks like this.
KNIME File Output Loop
In plain English the workflow does this on each iteration.
Uses a Group loop to iterate over only one group of records at once
Extracts the grouping item to be used as the file name. This isn’t necessary if you don’t need the grouped data to be used as part of the filename as you could create a dynamic timestamp instead.
Write the records to csv using the dynamic name fed in via a variable
You could of course add much more data manipulation between the loop start and end but this gives you the basic template for dynamically outputting files.
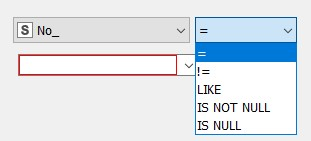
Sometimes using KNIME it would be nice to create a DB row filter based on a list of items. When not using DB tools you can use the reference row filter but this cannot be used with DB connections. The other standard method would be to use the DB Row Filter but this only supports a few operators such as = and like.
DB Row Filter options
If you want to filter by a long list that doesn’t follow a pattern it’s a lot of work to create the filter, plus it’s not dynamic.
Create a Dynamic “IN” Filter
My solution is to create a dynamic string that can be injected into the SQL using a variable and then used as part of an “IN” filter.
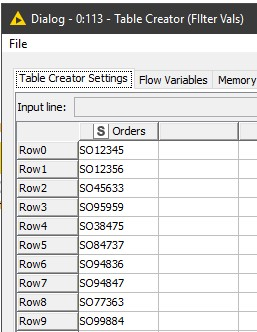
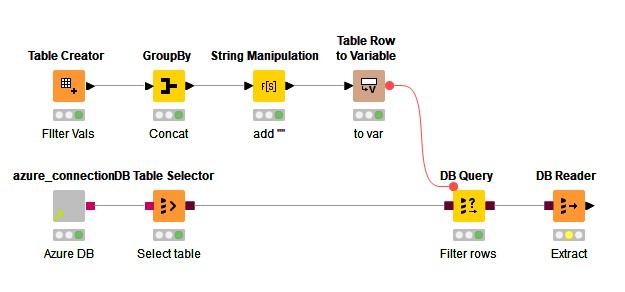
First create a list of the items you wish to use in the filter. In this case I’m using a static list but they could also come from a dynamically generated list.
Filter list
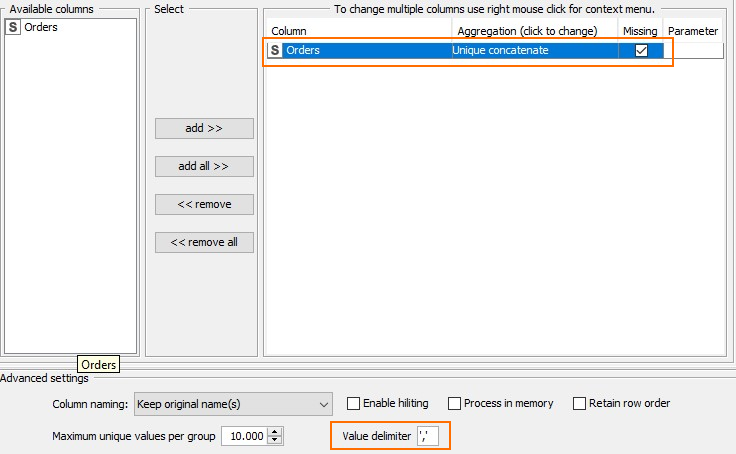
Next use a Group By node to concatenate the items into a single row using ‘,’ as a delimiter (note this is not just a comma but also the single quote marks). Do NOT group the items.
Grouping
Now we have along list of our items looing something like this, not we are missing the opening and closing quotes at the moment.
item1','item2','item3','item4','item5
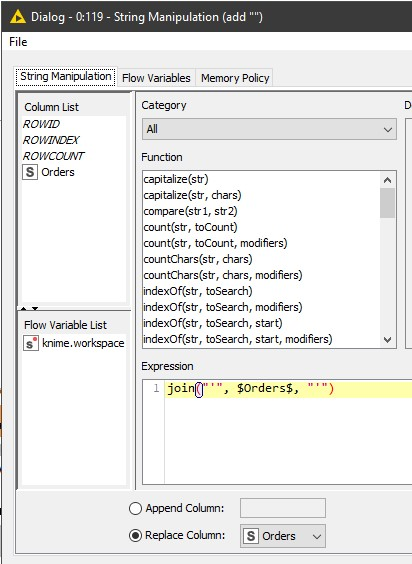
To close the quotes use a String Manipulation node with this configuration.
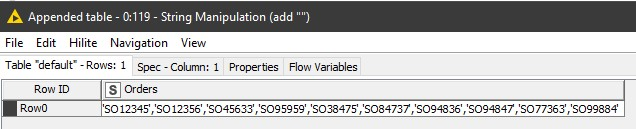
Our list is now in the correct format to inject into the SQL.
Filter string
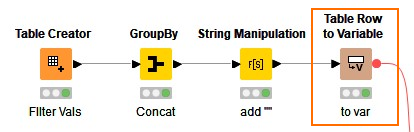
To add this to a DB Query first generate a variable from the table row.
Generate variable
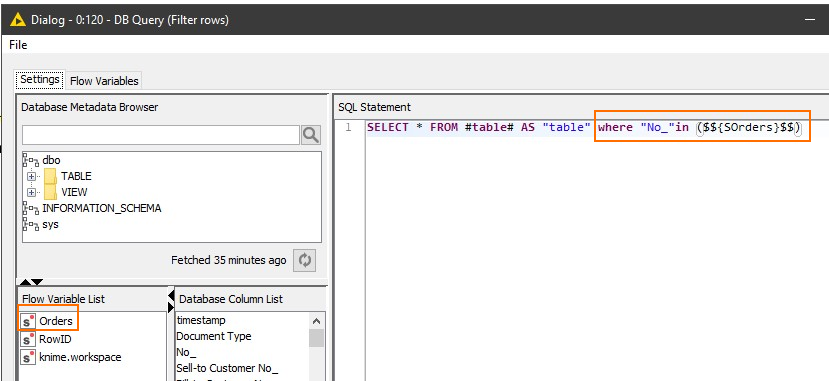
To add to the DB query connect this node to the DB Query node and create an SQL statement using the IN operator as shown below.
SQL IN Operator
This will generate an SQL query something like this where the list we created is inserted into the SQL.
SELECT * FROM (SELECT * FROM "dbo"."Sales Header"
) AS "table" where "No_" in ('SO12345','SO12356','SO45633','SO95959','SO38475','SO84737','SO94836','SO94847','SO77363','SO99884')
It’s common when creating a new workflow that after the flow is finished the source data can change. The most common scenario is when connected to a database table or view and the data gets extra columns added.
In this scenario you need to make sure that your workflow doesn’t break caused by the introduction of new data.
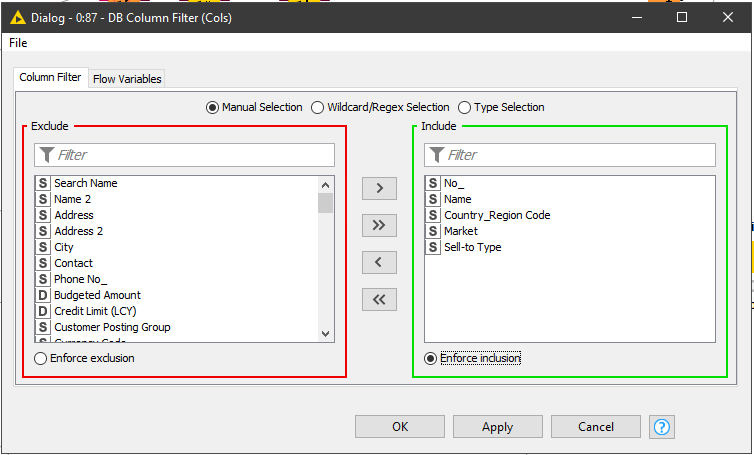
The way to control is this through the Enforce exclusion and Enforce exclusion setting in many configuration dialogs.
Enforce exclusion
This means that the list of fields you add to the Exclusion list will always be removed from the flow but any new columns that may appear will automatically be added to the flow in the Include list
Enforce Inclusion
This is basically the opposite. Only fields included in the Include list will be added to the flow, any new columns appearing will automatically be added to the Exclude list and remove from the flow.
Default Include or Exclude?
In general I want the data coming from a data source, whether it’s a database or a file, to be static so new fields are not automatically fed through my workflow. If I want them to propagate I’d rather control this myself. For this reason I set this to Enforce inclusion for the initial nodes directly after loading the data.
For nodes later in my workflow I do want changes to propagate, so if I make a new column it will automatically pass through to downstream nodes. Therefore I set this to the default of Enforce exclusion for all the downstream nodes after initial data load.
The KNIME default for new nodes is Enforce exclusion which in many cases is fine but just be aware what effect this will have on your flow if your data source changes to include extra fields.
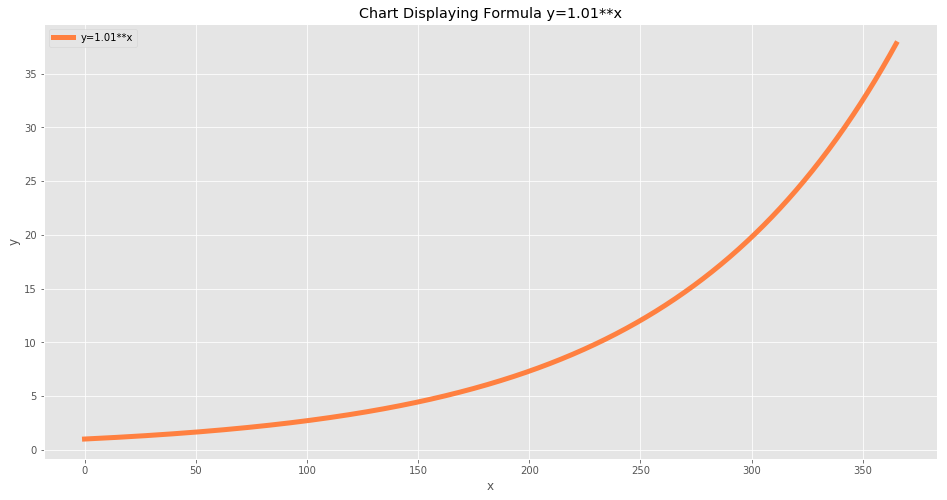
The easiest way to earn money, improve a product or learn new skills is very simple. Compounding.
If you invest money today in an Index fund and just leave it for 30 years you’ll probably be shocked how little it increases in the first 20-25 years and how much it increases after that. Even a 5% return per year returned into the initial investment with give huge returns given long enough.
It’s the same for skills.
This chart show what a 1% improvement every day for a year looks like. After 365 days you have an almost 38x improvement! But see how the first 200 days don’t feel so special, this is when it’s easy to give up as progress is hard and improvement comes slowly.
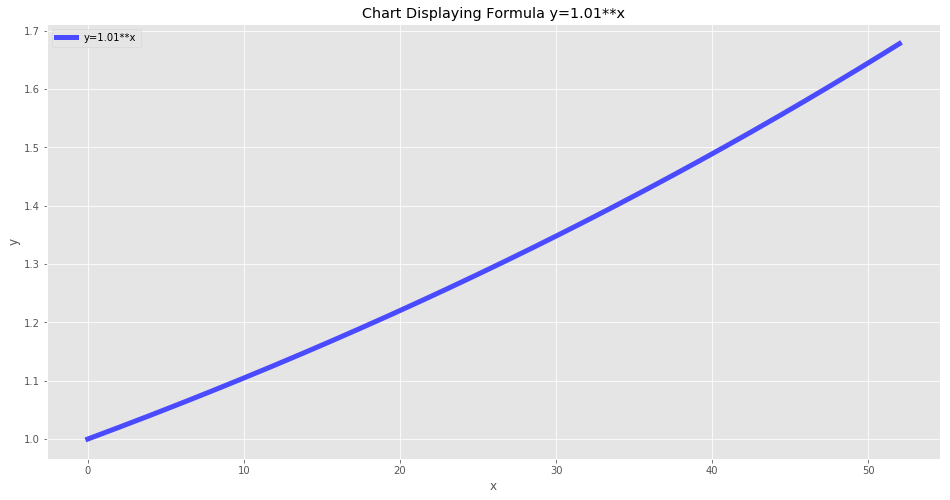
This is the same chart for a 1% improvement per week for a year. After 52 weeks you have a 1.7x improvement, still not bad! If someone told you that if you improve 1% a week for a year you’ll be 70% better at the end of the year I think you’d be happy.
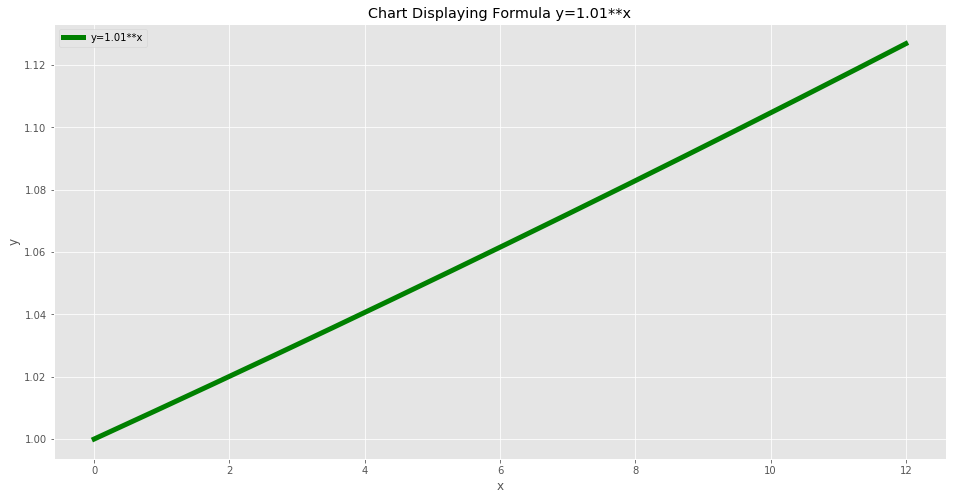
And finally 1% improvement per month for 12 months. This gives a 13% improvement after a year, still not a bad payoff for being 1% better at something per month.