
Now that my sensors are successfully collecting data and the data is being processed by a Node-RED flow on my Raspberry Pi the final step is to add some persistence to the data.
As it stands the data is constantly streaming and being displayed on a dashboard but after that it’s discarded so there’s no way to see the min or max temperature for say the last 24 hours. We need a database to store and query the data.
If you intend to use a Raspberry Pi as I have done then I wouldn’t recommend setting the database up on the SD card as the read-write traffic can easily wear out the card prematurely. For this reason I mounted an external USB drive to the Pi and create the SQLite database on the external drive.
You can read this post to learn how to mount an external drive in Linux.
Choosing a Database
Three choices spring to mind that could work equally well on a small device with limited computing power, SQLite, MySQL and PostgreSQL. All are readily available to install and reasonably easy to set up but for our data SQLite stands out as being by far the easiest to set up and administer.
The one major downside to consider with SQLite is that it’s a file based database meaning that you won’t be able to access the data from your LAN or the internet (at least it’s not recommended). If you need to do this consider PostgreSQL or MySQL.
To install the SQLite node in Node-RED follow these instructions.
Database Setup
I use the command line to create a database for our sensor data as it’s very easy and requires no extra install. First open a terminal, create the directory and then a database, mine is called sensors in /mnt/hdd/sqlite/
$ mkdir /mnt/hdd/sqlite/
$ cd /mnt/hdd/sqlite
$ sqlite3 sensors
SQLite version 3.27.2 2019-02-25 16:06:06
Enter ".help" for usage hints.
sqlite>
Now your in the sqlite3 command prompt so we can go ahead and create a table for our data.
create table sensordata (location text, temp float, humidity float, timestamp integer);Our table is very simple and just has four fields, location, temperature, humidity and timestamp. You can close sqlite3 using .quit. That’s all that’s required outside of Node-RED, our database is ready for data!
Using Node-RED with SQLite
The sqlite node requires little configuration, just add the node to the canvas and open the configuration. In the database entry click on the pencil icon to open the second screen shown below.
In the right hand screen type the location of the database you just created and make the mode Read-Write. Do Not make the mode Read-Write-Create otherwise the node will create a new database for you and will overwrite the one we already created.
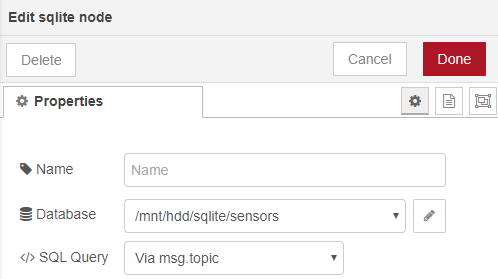

The node is now configured. To write or query data in the database send SQL insert statements to the node via the msg.topic so leave the SQL Query entry as-is.
Inserting Sensor Data
To inset data we create a msg.topic containing the inset statement we require, for example.
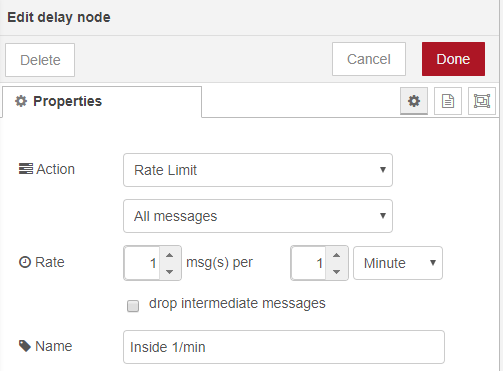
msg.topic = "insert into sensordata values('" + location + "'," + dectmp + "," + dechum + "," + unixtime+")"Another item to consider is that our beacons send new data every 3 seconds which is great for our live dashboard but is probably excessive for saving data. To reduce the volume of data we can add a delay node set to only allow one message per minute.
Just make sure if you have multiple sensors this applies per sensor otherwise we risk losing data form some locations.
We can check the data is being correctly inserted into the database using the sqlite3 command line again. Open the database in SQLite3 and query the database.
$ sqlite3 sensors
SQLite version 3.27.2 2019-02-25 16:06:06
Enter ".help" for usage hints.
sqlite> select count(*) from sensordata;
5916
We see that the database has 5915 rows of data. We can now query the database to get min and max statistics per location for example and also show this data on the dashboard.
sqlite> select location,min(temp),max(temp),avg(temp) from sensordata group by location;
inside|20.91796875|21.88671875|21.2298818322616
outside|21.15625|23.21875|21.5752918956044
The flow to save the data is shown below showing the nodes to throttle the data for each sensor.

Adding Statistics
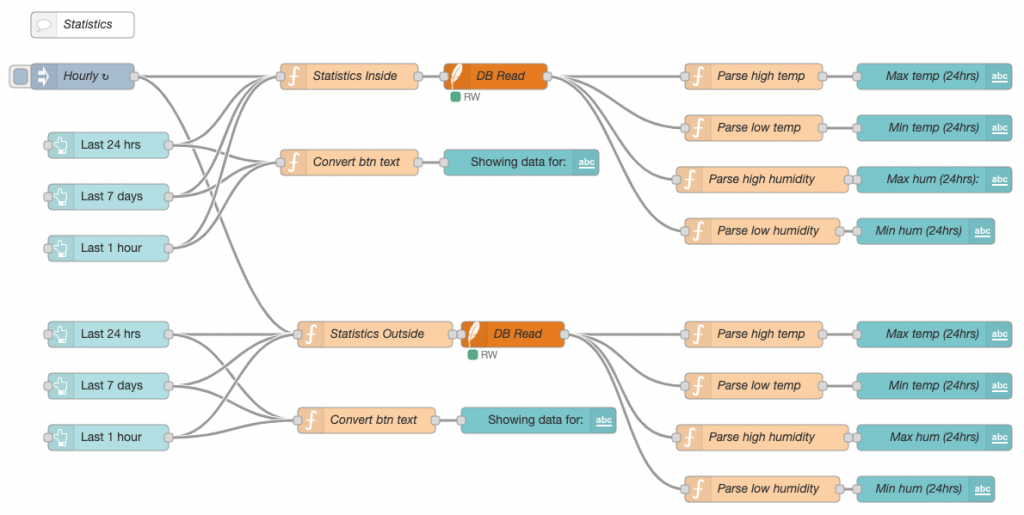
This flow creates three buttons on the dashboard, one to show statistics for the last hour, one for the last 24 hours and the other for the last 7 days. The buttons are set up to send numerical data in hours, 1, 24 and 168 and the function node then creates an SQL statement for the required period by modifying the timestamp.
// converts hours injected to seconds
timespan = msg.payload*60*60

// gets current time in milliseconds, converts to seconds and subtracts the 'lookback'
msg.topic = "select max(temp) tmphigh,min(temp) tmplow,max(humidity) humhigh,min(humidity) humlow from sensordata where location='inside' and timestamp >= " + (Math.round((new Date()).getTime() / 1000)-(timespan))
return msg;
This function converts hours sent from the button node to seconds and then creates an SQL statement that filters the data using a WHERE statement that calculates the current UNIX time and minuses the required period.
Once the query is sent to SQLite the final nodes are to format the output and display the data as text on the dashboard along with a text label that changes depending on which button was pressed last.

We could also add statistics for when the min and max temperatures were recorded with this SQL.
sqlite> SELECT location,datetime(timestamp, 'unixepoch', 'localtime'),temp FROM sensordata WHERE temp=(SELECT min(temp) FROM sensordata);
inside|2019-10-30 06:18:23|20.91796875
inside|2019-10-30 06:18:23|20.91796875
inside|2019-10-30 06:19:23|20.91796875
...
inside|2019-10-30 06:30:22|20.91796875
inside|2019-10-30 06:31:22|20.91796875
inside|2019-10-30 06:31:22|20.91796875
We see the min temp has many records starting at 06:18:23 and ending 06:31:33.
Summary
We have now setup sensors, collected the data using Node-RED and MQTT, created a dashboard to show the live streaming data and also used a SQLite database to store the data for later querying.
This solution could easily be extended with extra sensors of the same type or we could add other sensors such as Hall sensors (to monitor doors or windows opening), CO2 sensors and so on.
We could also add analytics to our solution by querying the data from the database.
An awesome write out & its help the world turn faster & better keep going bro !