Amazon S3 (Simple Storage Service) is a very commonly used object storage solution that’s cheap to use and highly reliable. Think of it as a file system in the cloud with enterprise features that you can use to store almost anything.
Amazon S3
This guide assumes you already have a working Amazon S3 account and you have created a storage bucket along with a user authorized to read and write to the bucket. You must also have the Key ID and Secret Key for the user so we can authenticate from Node-RED.
Node-RED Flow
Open Node-RED and add the node-red-node-aws palette. This will install nodes for reading, writing and watching for events in your bucket.
To test create a simple flow like below where you input some data using the inject node, append the data to a text file and then upload the file to your S3 bucket using the amazon s3 out node.
Node-RED test flow
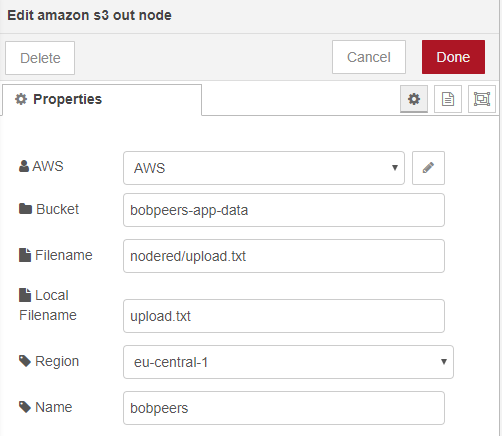
The configuration of the amazon S3 out node should look like this:
AWS is where you enter your AccessKeyID and Secret Access Key
Bucket is the name of the S3 bucket you created
Filename is the name of the file you want to create in S3 including any folder path
Local filename is the file you wish to upload
Region is the AWS region you S3 bucket is located in
Amazon S3 Out Configuration
That’s all there is to it, when you deploy and run the workflow the inject node will append the timestamp to the end of the upload.txt file and then upload the file to S3.
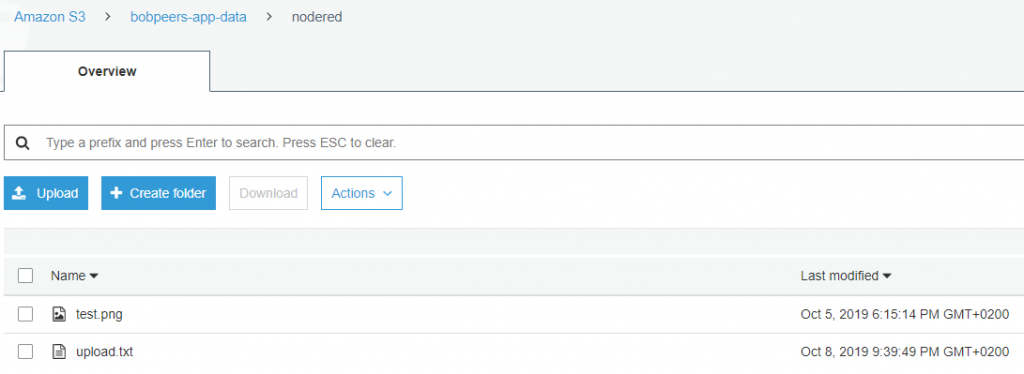
If you log into the S3 console you’ll see the file and contents.
Amazon S3 Console
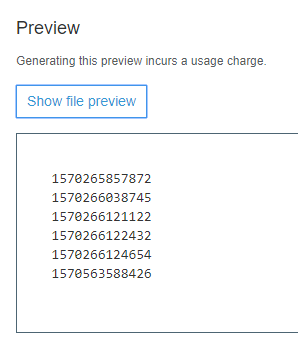
Previewing the file contents in S3 shows the appended timestamps.
If you’re running a Bitcoin full node and want to run RPC commands against the Bitcoin client from a remote machine the easiest and safest way to do this is using Port Forwarding over an SSH connection.
What is Port Forwarding used for?
Secure access to a port that is otherwise not listening on a public network interface. This is common with database servers like MySQL. Encryption for for services that may not natively use encrypted connections.
This also gives you the flexibility of using Python (or another language) from the remote machine without having to install it on the Bitcoin node.
In my case I’m going to use Python in a Juptyer Notebook to query the node using Termius as the SSH client.
The Bitcoin node is running on my local network and does not accept RPC commands from the internet, but using port forwarding I’ll be able to query it from my laptop from any location.
Install an SSH Client
On Windows I recommend Termius as it’s very easy to use and has a nice graphical interface (it’s also available for Mac, Linux, Android and iOS) but you could use any SSH client (PUTTY for example).
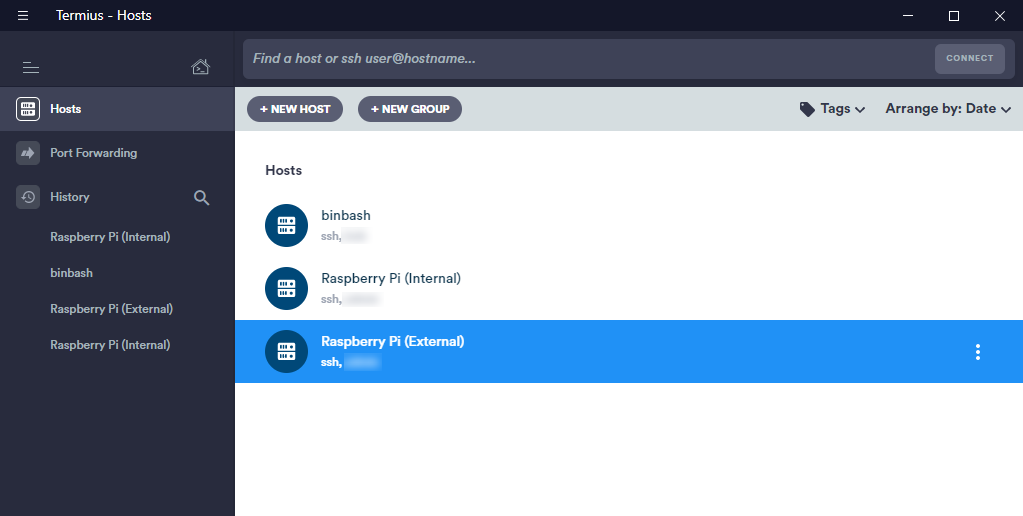
First create an SSH host to the Bitcoin full node.
Create an SSH host
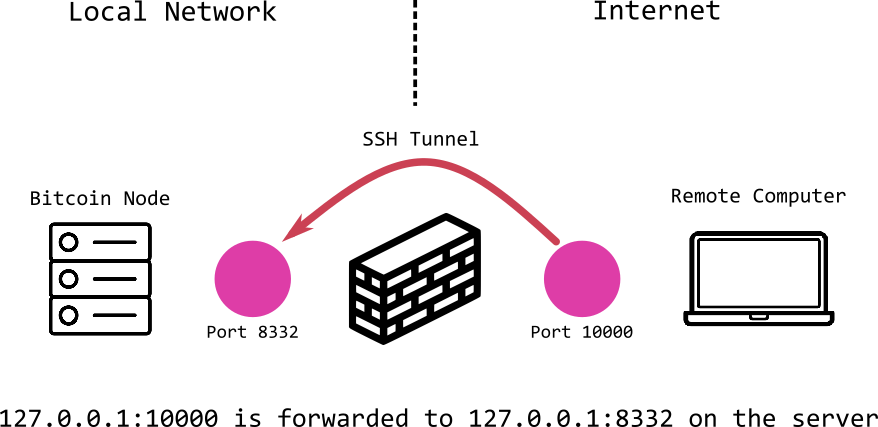
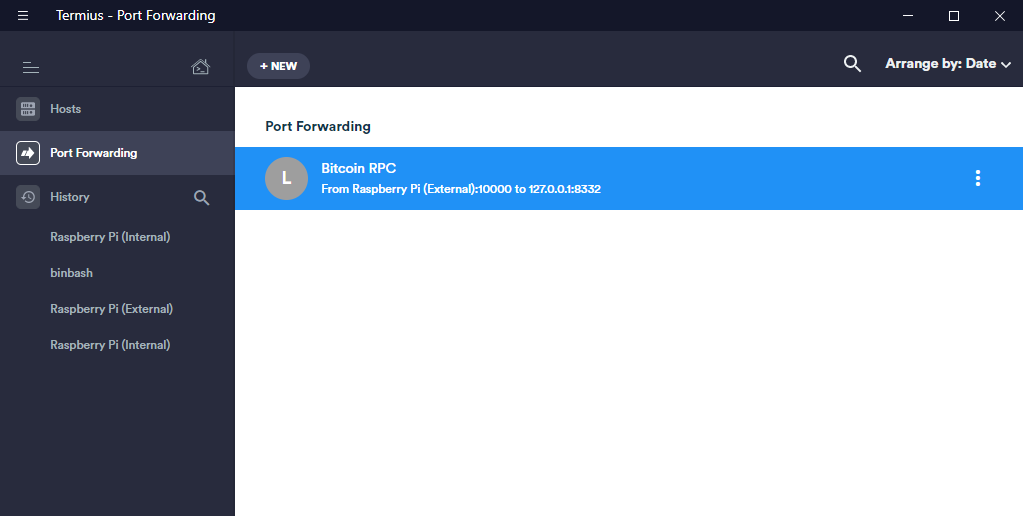
Then create the forwarded port. On your local machine you can select any port that’s not in use, in my case I use port 10000.
When I connect to my local machine on port 10000 the port is then securely forwarded to the remote machine on port 8332, which is the port the Bitcoin RPC server listens on by default.
So 127.0.0.1:10000 becomes BITCOIN_NODE:8332
Forward a local port to the Bitcoin RPC port (8332)
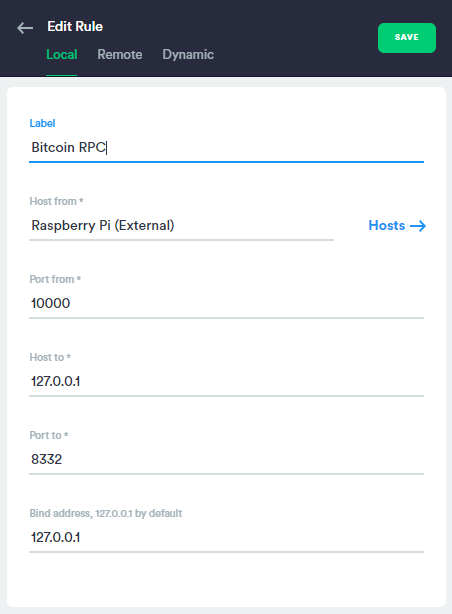
The configuration page should look something like this.
Configuration pane for port forwarding
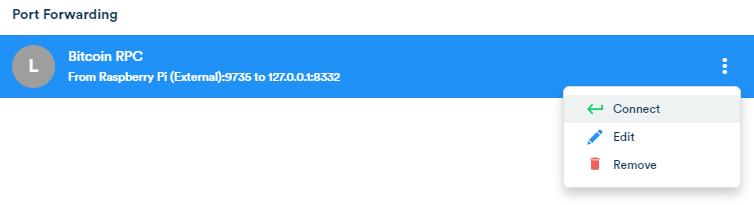
Open the port by clicking connect.
Connect the forwarded port
Python Bitcoin Library
To use python with your Bitcoin node use the python-bitcoinrpc library. To install simply use:
pip install python-bitcoinrpc
Next get the rpcuser and password you added to your bitcoin.conf file
Once installed create a connection to the node using these credentials. The IP will always be locahost (127.0.0.1) and the port is the same port you used for the forwarding, 10000 in my case.
One connected we can query the node using regular RPC commands. Here I get the last 10 blocks and return the block height, timestamp, number of transactions in the block, difficulty and nonce.
bci = rpc_connection.getblockchaininfo()
maxBlock = bci["blocks"]
for i in range(maxBlock,maxBlock-10,-1):
    bbh = rpc_connection.getblockhash(i)
    bh = rpc_connection.getblockheader(bbh)
    print(bh["height"],bh["time"],bh["nTx"],bh["difficulty"],bh["nonce"])
So everyone knows Machine Learning / Artificial Intelligence / Cognitive Computing, call it what you will, is the new marketing catchphrase for people trying to sell their software products and services. You can be sure if it’s not already baked in then it’s in the roadmap for 2020.
It used to be ‘Big Data’, but we got tired of hearing that, so a few control+h presses later and, hey presto, Machine Learning (ML) has arrived.
Don’t get me wrong, I’m convinced ML will have a profound effect in the coming years, but like most technologies, we overestimate the short term effect and underestimate the long term.
As the saying goes, the future is already here — it’s just not very evenly distributed.
I read lots of articles on ML that seem fantastic but it’s hard to get a grasp on something when you haven’t really used it for yourself. I wanted to know if ‘ordinary’ people can use it, and what for? To satisfy my curiosity I decided to see if I could train a neural network to generate product names for clothing based on the product names we are already using in IC Group.
Getting Training Data
Data is the raw material for Neural Networks and the more data the better. If you’re data is already big then great! If not then don’t worry, you can still get interesting results.
To feed the network I extracted the entire history of style names of our three core brands, namely Peak Performance, Tiger of Sweden and By Malene Birger.
After cleaning the data to remove numbers and other ‘junk’ (for example Peak Performance often start style names with the abbreviation ‘JR’ for junior ), the raw data consisted of the following number of style names.
Peak Performance: 7,590
Tiger of Sweden: 13,087
By Malene Birger: 15,419
Not a huge corpus of data to go with but hopefully it should be enough to generate something of interest.
How Does This Thing Work?
The type of Neural Network I used is technically called a Recurrent Neural Network, or RNN for short. It essentially takes training data and ‘learns’ patterns in the data by feeding the data through layers. It also has some ‘memory’ (called LTSM or Long / short term memory!) so that as well as the input to the layer having influence it also selectively remembers or forgets the result of previous iterations.
For text this means you can feed the network large passages of text and the network will ‘learn’ how to write new text without knowing anything about grammar, spelling or punctuation. If you feed it all of Shakespeare’s works and train enough it will generate text that looks like real Shakespeare but is completely new work!
It may sound pretty complicated (and it is) but as a user you don’t really need to know much to get started. There’s ready-to-use scripts everywhere on the internet (Github + Google are your friends) that have full instructions. It’s very much plug and play and took me about an hour to get started from scratch.
I’ve also included links at the bottom of the article pointing to the code I used.
Our Current Product Names (The Training Data)
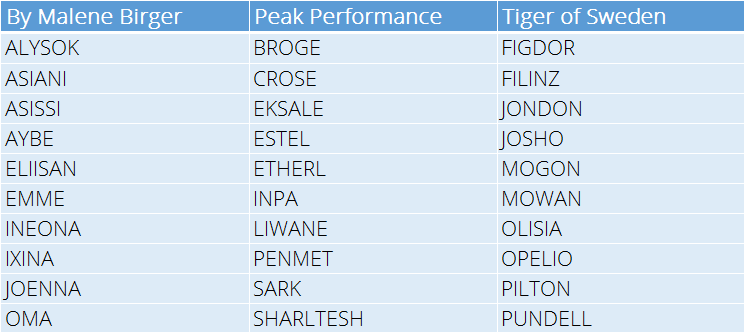
To give you an idea what types of product names we currently use I selected a few at random to give you a taste. Note that they are all short names (no more than 10 characters) and are not always ‘real’ words or even names.
A sample of our current product names
The names tend to have a Brand ‘feel’, so for example By Malene Birger use softer, slightly exotic sounding names to fit their Brand image and target consumer. It will be fun to see if the Neural Network can get this detail right.
Training the Network
This process is surprisingly simple. Just feed the network a text file with all the current names, one file per brand, then run the training script, sit back and get a coffee or three.
Neural Network Training
Since the training data is fairly small this doesn’t actually take very long (it took me a couple of hours per brand using a virtual machine) but is highly dependent on a handful of parameters that can be set plus the capabilities of your computer. Probably the most important parameters are these:
Number of layers in the network
RNN size, this is the number of hidden unit (or nodes) in the network
Training Epochs, basically how long to train the model for
Basically more layers, more nodes in the layers and longer training gives better results but can take much longer and the benefit isn’t always worth the effort. Trial and error often works just as well!
Does This Thing Really Work?
After training the model we simply use it to generate new names. This is called sampling the model, you can generate samples using some starting text but in my case I just let the model pick a random starting point.
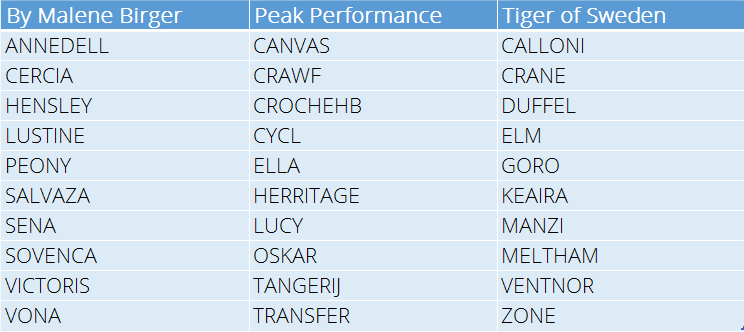
So here’s a sample of the names generated per brand.
Names generated from the neural network
Bearing in mind that the network knows nothing about language I think it did a remarkably good job of capturing the essence of the brands names.
To emphasise once again, the network doesn’t know anything about the constructs of words, what vowels are or anything else for that matter. It learns these patterns purely from the training data and then builds a model to generate new words using the same rules.
The model can be sampled over and over again so there’s an unlimited supply of names.
Can Neural Networks be Creative?
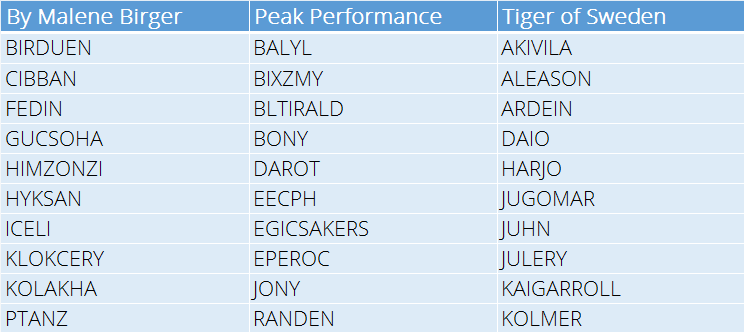
If we really want to play around we can change the parameters of the sampling to try and generate more creative names.
One of these parameters (called temperature) basically tells the network how confident it should be about the name (actually how confident it should be about the next letter in the generated word). If we turn up the temperature the model becomes more aggressive and suggests ‘wilder’ names.
Some more exotic examples
I would definitely buy a blazer from Tiger of Sweden called JUGOMAR or maybe my girlfriend would like a dress from By Malene Birger called CIBBAN or some Peak Performance ski pants called RANDEN.
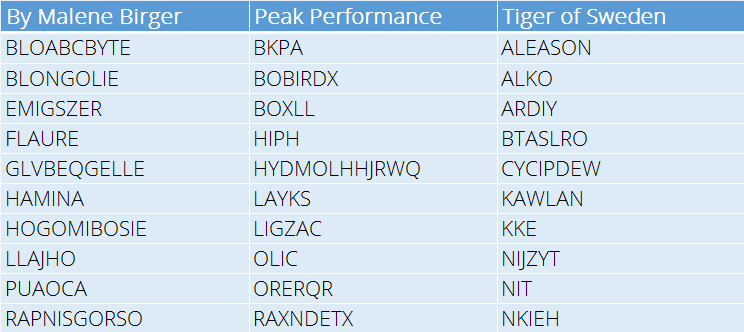
Of course if we turn up too much on the creativity then it starts to generate some nonsense!
It’s starting to go crazy!
But even in the weirdness we get names like FLAURE, LAYKS and KAWLAN which I think sound like great product names 😃
Summing Up
This was of course all done for fun, but it shows that these types of networks are not impossible to use and someone with decent computer skills can get these up and running in a matter of hours.
If ML really is going to explode in the coming years then they will need to be easier to interact with than they are today. There will never be enough data scientists to satisfy demand, so just like spreadsheet programs made everyone a numbers whizz I expect user interfaces and APIs will be developed so less skilled users can create, train, and deploy ML models into production.
It Almost Makes Sense
As a final challenge I tried making new product descriptions by training the model on current descriptions. It almost makes sense but could maybe do with a bit more training 😉
This is one for Peak Performance!
Stylish Mid feel shortany ski town, it with a shell is a fixent windproof, comfortable, keeping this fit delivers the wicking, breathable Joad.
References If You Feel Inspired To Try Yourself!
If you feel like reading more or even trying for yourself then the code for the RNN is available to download here.
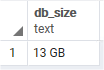
This SQL simply gets the total size of the database in a human readable format.
SELECT pg_size_pretty(pg_database_size('postgres')) as db_size
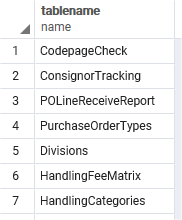
List all Tables
This lists all the tables in the database public schema.
SELECT tablename FROM pg_catalog.pg_tables WHERE schemaname = 'public'
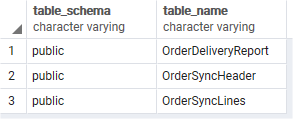
Search Schema for Column Name
I often need to search all the tables or views to find which contain a particular column. Replace ‘COLUMN_NAME’ with your column below.
SELECT t.table_schema,t.table_name
FROM information_schema.tables t
INNER JOIN information_schema.columns c
      ON c.table_name = t.table_name
      AND c.table_schema = t.table_schema
WHERE c.column_name = 'COLUMN_NAME'
      AND t.table_schema not in ('information_schema', 'pg_catalog')
      AND t.table_type = 'BASE TABLE'
ORDER BY t.table_schema;
In this case I searched for all columns containing the word ‘order’.
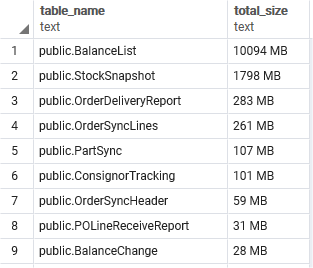
Table Sizes
Retrieve the size per table in the public schema from largest to smallest.
SELECT nspname || '.' || relname AS "table_name",
        pg_size_pretty(pg_total_relation_size(C.oid)) AS "total_size"
FROM pg_class C
LEFT JOIN pg_namespace N ON (N.oid = C.relnamespace)
     WHERE nspname = 'public'
     AND C.relkind <> 'i'
     AND nspname !~ '^pg_toast'
ORDER BY pg_total_relation_size(C.oid) DESC
Full Schema
SELECT * FROM information_schema.columns WHERE table_schema = 'public'
Interacting with Blockchains and blockchain technology probably seems for most people like a very complex task. How to even get started? Don’t they run on some servers spread across the globe? How would I make a transaction and see the result? Wouldn’t I use to use real money to do this?
If you want to play around with using Blockchain technology but don’t know how to get started a great way is to run a local test blockchain on your own computer. It’s easy to set up, carries no risk of losing your own money, gives you immediate insight into what’s happening and can just be reset at any moment so you can try over and over again.
We’ll use two applications to get started:
Ganache
MetaMask
From start to finish it should take no longer than 30 minutes ⌛
Ganache – A Personal Blockchain
The absolute easiest way to get started is by using Ganache. Ganache is a personal Ethereum blockchain running on you own computer that’s incrediby easy to install and get running. It’s basically a virtualized blockchain application.
It’s available for Windows, Mac and Linux, just download the installer, double click to install and run. Takes 5 minutes to get started.
MetaMask
Once Ganache is installed you need a way to interact with the blockchain. There are many applications available to do this but the easiest is probably MetaMask. It’s a browser extension that supports Chrome, Brave, Firefox and Opera plus has iOS and Android apps in beta. Follow the directions on the site to install and create an account.
We will use MetaMask to connect to our local blockchain server so we can add accounts and send test transactions between the accounts. These transactions we will then be able to see in Ganache.
To install MetaMask get it from the Chrome Web Store and follow the instructions to create an account.
Connect MetaMask to Ganache
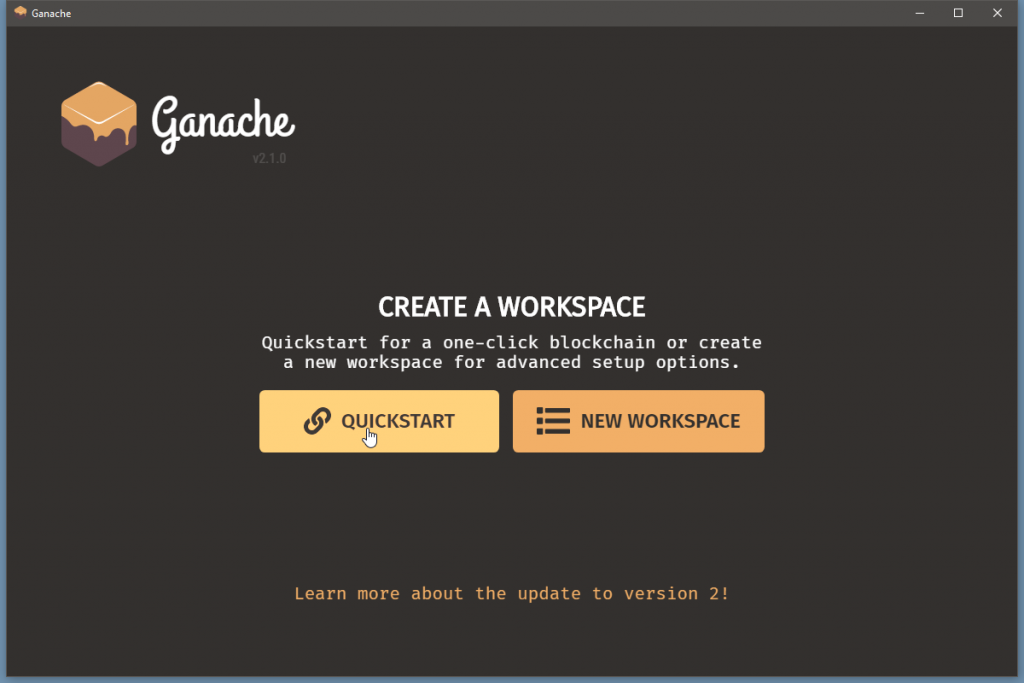
Assuming you have now installed Ganache and MetaMask we need to connect the applications. First run Ganache and select the Quickstart option. This uses the default settings and get us up and running.
Ganache starting view
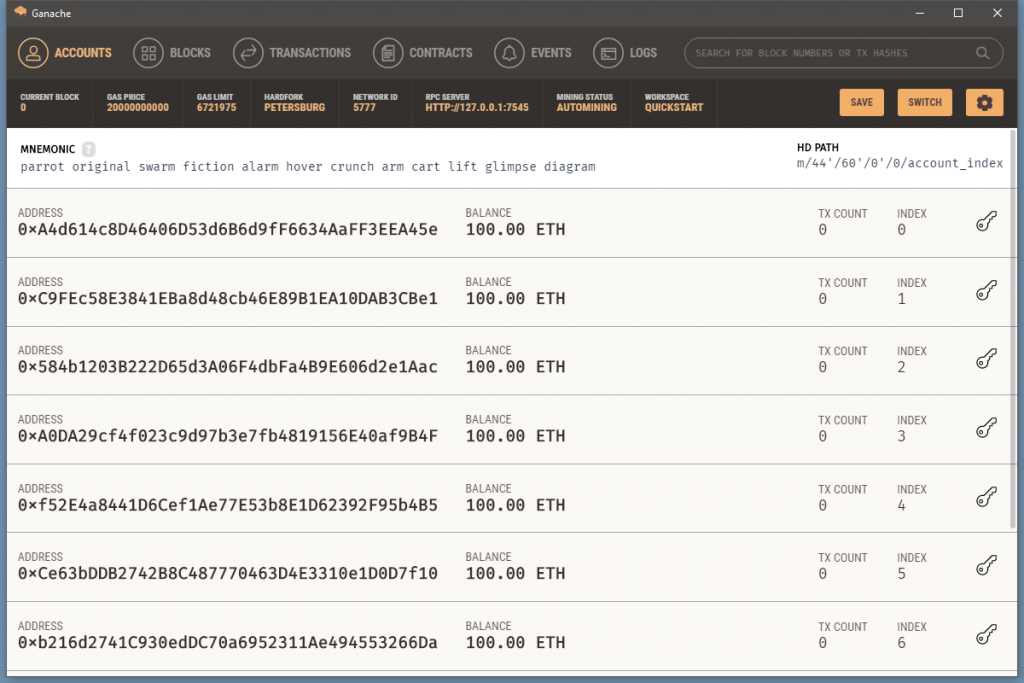
Ganache will now create a test blockchain and some test accounts which by default have 100 ETH (test ETH of course) in each. You can see the accounts below along with their public addresses, balance and transaction counts. That’s all there is to getting the test blockchain 🤜
Gamache accounts view
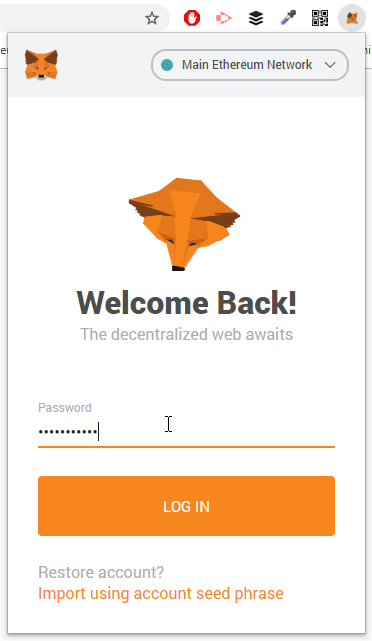
Now that Ganache is running we need to connect it to MetaMask. Open MetaMask and log into your account.
MetaMask login
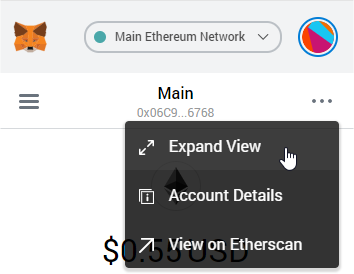
To make working in MetaMask easier you can click on the more menu and choose ‘Expand View‘ to open it full screen.
Expand to fullcreen
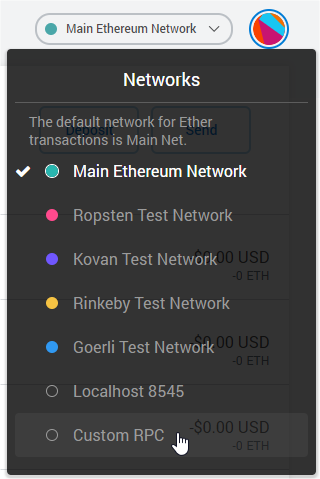
To connect MetaMask to our local blockchain we need to change a few setting in MetaMask. First click on the network name at the top and select ‘Custom RPC‘
Change MetaMask network
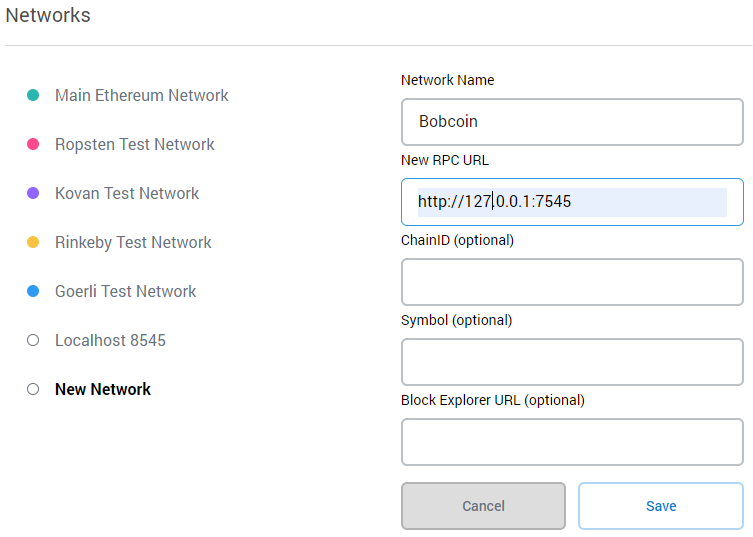
Here we add the details for our local blockchain. If you look in the header of Ganache you can see the server details we will use.
Ganache RPC server settings
Call the network anything you want, the URL must be http://127.0.0.1:7545 as Ganache is running on port 7545 on localhost and leave the rest blank.
Once you click save you are now connected to the Ganache blockchain, although right now there’s not much to see. To really see what’s going on we need to add accounts to MetaMask.
Adding Accounts
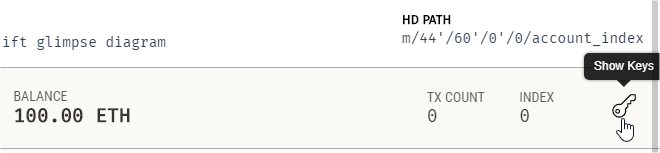
Returning to Ganache choose one of the accounts to add and click on the key symbol. This will allow us to see the private key of the account. Obviously this is not something you would normally be able to do since private keys are, by their nature, private.
Show the private key
Copy the private key address from the next screen.
Copied private key
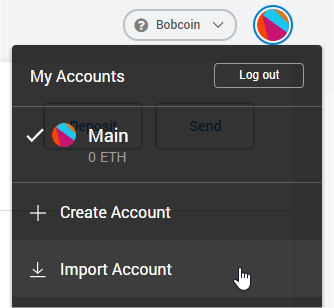
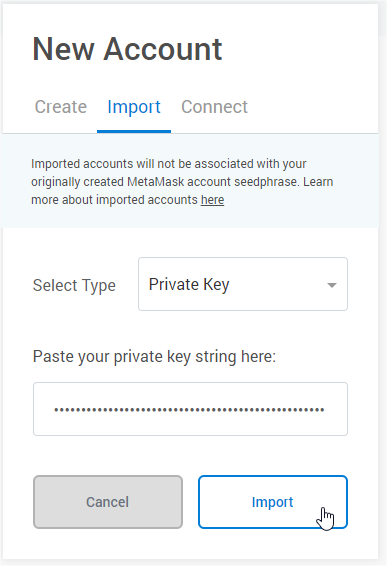
Returning to MetaMask, click on the circle logo and select ‘Import Account‘
Import accounts
Make sure the type is Private Key and then paste in the private key you copied from Ganache.
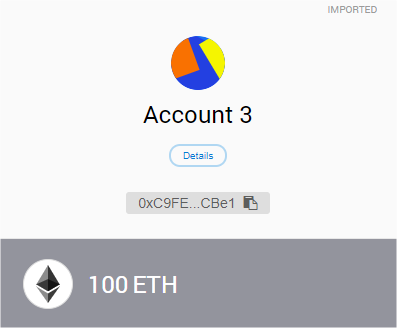
You’ll see the account is imported with a balance of 100 ETH which matches what we saw in Ganache. You can edit your account name by clicking on the name and changing it in the dialog that opens.
Imported Account
Creating Transactions
Now we’re finally ready to start interacting with the blockchain and creating transactions.
First in Ganache choose an account you wish to send ETH to and copy the address.
Recipient Address
Back in MetaMask click the Send button as shown here.
Sending test ETH
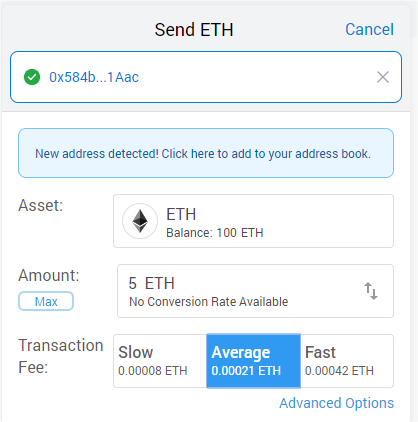
In the ‘Add Recipient’ field paste the account address you just copied from Ganache, choose the amount of ETH you wish to send and pick a Transaction Fee. Because this is a test network the fee is irrelevant as the blocks are mined automatically but normally this fee controls how the transaction will be prioritized by miners.
Send options
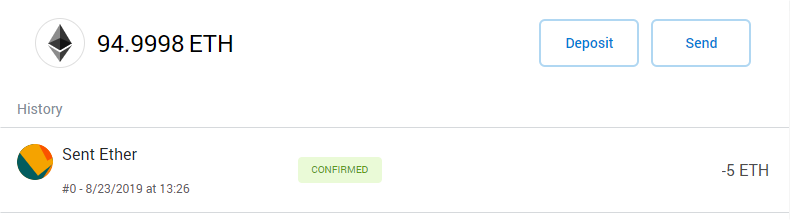
You’ll now see in MetaMask the transaction and remaining balance (100 – 5 – transaction fee)
Transaction in MetaMask
The same can be seen in Ganache, so the sending account is debited with 5 ETH and the receiving account credited with 5 ETH. The transaction fee has been used by the blockchain to create the block containing the transaction.
New balances in Ganache
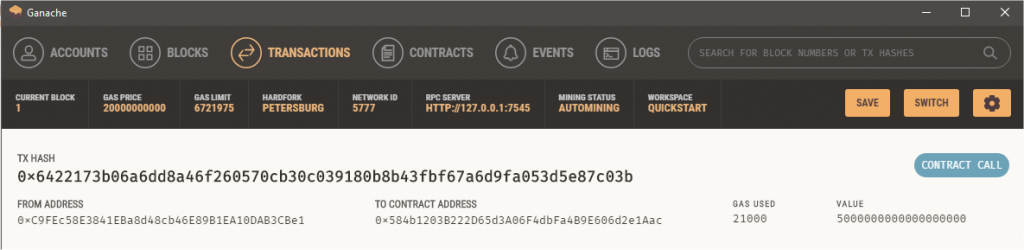
Selecting the transactions tab in Ganache gives you a view of all the transactions made so far.
Blockchain Transactions
Selecting the Blocks tab in Ganache gives a view of the blocks mined. So far you can see one block was automatically created when we started Ganache. This is known as the Genesis block and forms the head or root of the blockchain. Our transaction created a new block linked to this initial block. Every block created after the initial block is mathematically linked back to the previous block and so on all the way back to Genesis block (block 0).
Now my Bitcoin Full Node is fully synchronized and running I thought it would be good to set up some simple monitoring to check it’s still up and up to date with the Bitcoin Blockchain.
Bitnodes API
Helpfully there’s already a site that monitors all the full nodes and also provides a handy API at https://bitnodes.earn.com/ .
Bitnodes site
If you look at the full list you can see there are currently 9034 full nodes worldwide with 20 up in Denmark.
Worldwide full node list
Since the site already monitors nodes I can cheat and use their API ( https://bitnodes.earn.com/api/) to get the data on my own node. The relevant endpoint is the Node Status endpoint since this returns the UP/DOWN status as well as some other useful information such as what block height the node is currently synchronized to.
So now I have an easy data source, but how to get notifications from this data? This is where Node-RED comes in useful. On my server with Node-RED already installed I create a small workflow that is triggered to run every hour using the insert node.
Node-RED monitoring workflow
Once triggered the workflow does the following:
Call the Bitnode API
Parses the returned JSON to extract the status and blockchain height
Calls another API to get the current Bitcoin block height (to compare to my node)
Formats a payload and sends to Slack using a webhook
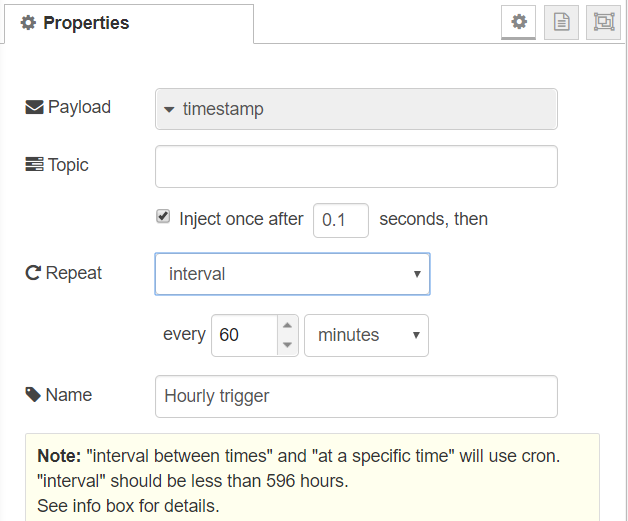
Creating a Schedule
Using the inject node it’s possible to set up a schedule for the flow to run. This could be every X seconds, minutes, hours or at a specific time. I’ve set the flow to run every hour.
Inject node set to run every hour
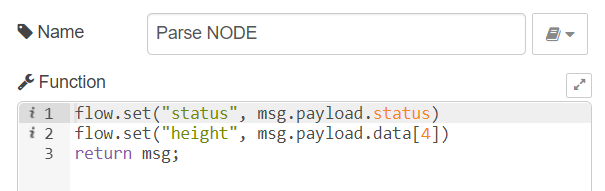
Parse JSON from Bitnodes
Parse JSON
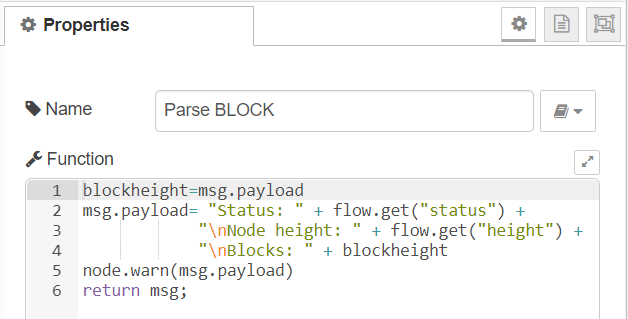
This node parses the returned JSON and saves the status and current block height to variables for later use.
Get Bitcoin Block Height
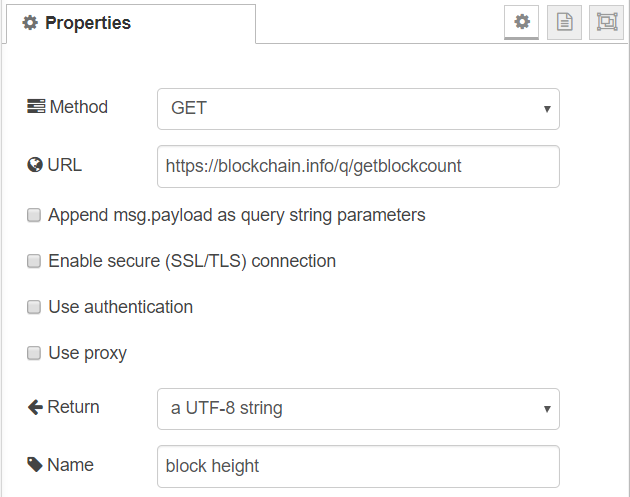
To get the current height of the Bitcoin Blockchain we can use the Blockchain.info API. Call to https://blockchain.info/q/getblockcount returns the height in plain text.
Blockchain.info API
This is combined with my node data to create a message payload.
Message Payload
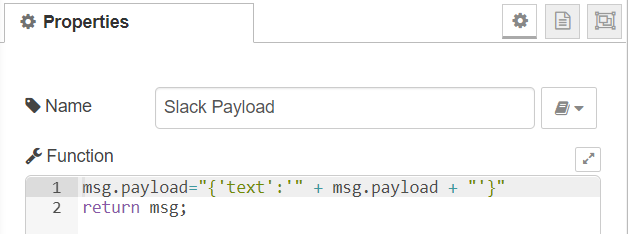
Post to Slack
Finally the payload is formatted ready for posting to Slack.
Slack webhook payload
Then sent via the Slack webhook.
POST to Slack via webhook
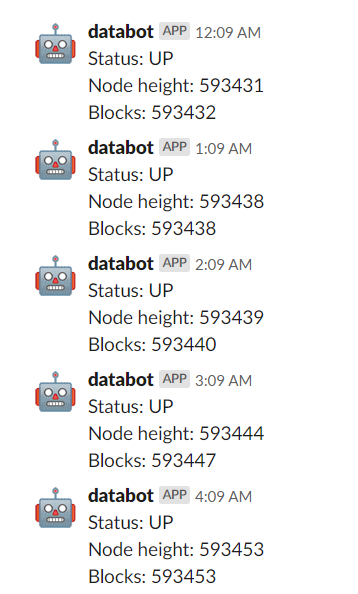
This is how the data appears in Slack. You can see the inject node in Node-RED is running the flow every hour and my node is keeping up with the Blockchain as it only every falls a few blocks behind the main chain before catching up again.
Node data posted into my Slack channel
So by using Node-RED and minimal coding in JavaScript I’ve set up an automated monitoring tool for my Bitcoin Node where I can see the progress every hour and be notified both on my desktop computer and on mobile 💪
I’ve wanted to run a Bitcoin full node for a while now. Not because it makes any money, quite to the contrary, it actually costs money to run a node, but to better understand a technology there’s nothing better than learning by doing 🧠
A full node is a program that fully validates transactions and blocks. Almost all full nodes also help the network by accepting transactions and blocks from other full nodes, validating those transactions and blocks, and then relaying them to further full nodes.
Once you have a full node running you can also query the blockchain locally using the command line or from Python for example, plus if you allow inbound connections you are contributing to the network.
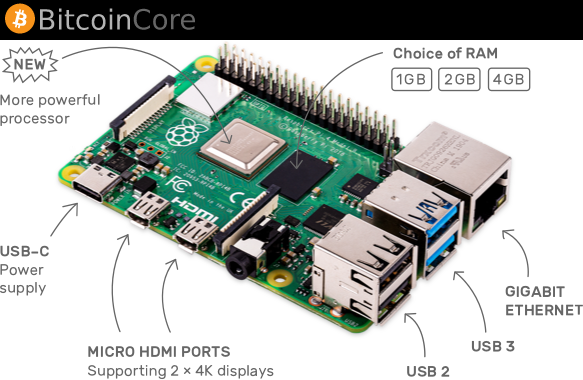
I wanted the setup to be cheap, easy and reliable so using a Raspberry Pi was the obvious choice. My first attempt was a few months ago using a Raspberry Pi 3 Model B+ I bought second hand for next to nothing. I managed to get it up and running but the strain of the initial blockchain download and synchronization (currently running at 275 GB) would frequently crash the Pi due to lack of memory. Slightly frustrated I gave up and parked the idea for a while.
A New Start
Skip forward a few months and now the Raspberry Pi 4 is available with way better performance 🚀
Raspberry Pi 4
I bought the 4 GB version that’s now running the headless (no GUI) version of Raspbian Buster Lite and is connected to an external 1 TB hard drive. I use SSH to connect so no need for mouse, keyboard or screen, just power and a network connection.
Installing
First a WARNING. Don’t do this if you have a metered or capped internet connection as you’ll be downloading the entire Bitcoin blockchain of 275 GB (currently).
I won’t cover the details for initial setup of your Raspberry Pi as there’s a full guide from the Raspberry Organization.
Likewise the Bitcoin Core install details have been extensively documented by many others, the guide I used was RaspiBolt on GitHub. I didn’t get as far as installing Lightning but the guide is excellent and unlike many guides I’ve tried works 100% if you follow every step carefully. The only deviation I made was starting my node directly on Bitcoin Mainnet (instead of testnet) by editing this one line in the bitcoin.conf so testnet=1 is commented out.
# remove the following line to enable Bitcoin mainnet
#testnet=1
The entire install including initial setup of the SD card took about 1-2 hours but you learn a lot along the way, the basic steps being:
Download and install Pi OS to SD card
Enable ssh
Setup your local network
Create users on the Pi
Mount external disk
Setup firewall and security
Download and install Bitcoin Core software
Configure and start Bitcoin Core
Grab a ☕ or ☕ ☕ and wait
Progress So Far
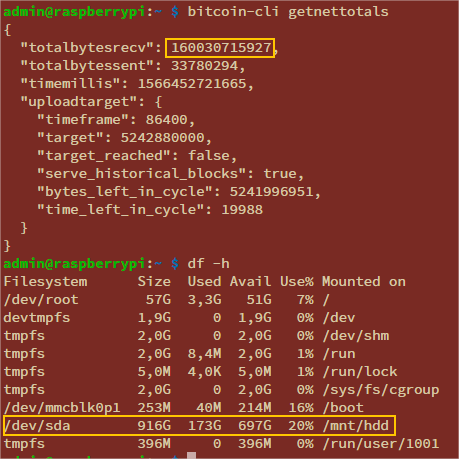
You can see below that I started the software about 4 days ago.
Using the bitcoin-cli command you can query the bitcoin process. You can see in the last 4 days I’ve downloaded 160030715927 bytes or about 160 GB and that my 1 TB disk is 20% filled with 173 GB of data stored.
Blockchain disk spaced used
To see all the possible commands type ‘bitcoin-cli help’ (there’s a lot!)
To make it easier to see exactly how far I am from synchronizing the full blockchain I added this script to my Pi. Just paste this code into your text editor (nano or vi for example), save the file (as blocks.sh in my case) and make it executable with chmod +x blocks.sh
If you have SSH access to a server and want an easy, visual way of uploading files that can be automated and scheduled then using KNIME works great.
Simple file upload over ssh
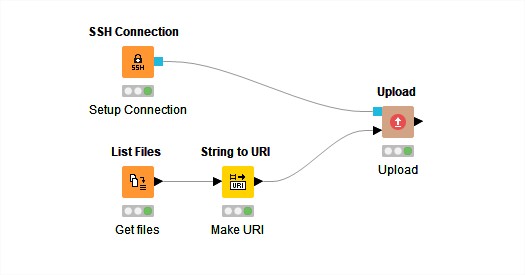
Fortunately KNIME already has an SSH Connection node so the set up is very easy. The basic flow is as follows:
Make a connection the ssh server
List the files to be uploaded
Make URIs from the file locations
Upload files to the server
SSH Connection 🔐
I recommend you always use ssh keys 🔑 to connect to your server. In my case this is already set up but if you want to learn how to do this yourself see this guide. To create keys from Windows you need to install Putty and follow this guide.
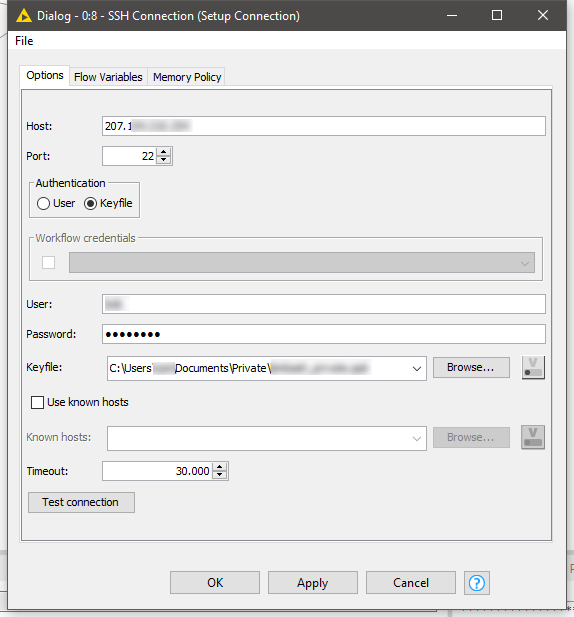
Once you have your private key adding this to KNIME is straightforward. In the SSH Connection node:
Add your servers IP address or hostname
Select keyfile as authentication method
Add the user you wish to log in as and the password of the private key (if you created one). This is not the password of the server.
Browse to the location the saved private key
KNIME ssh connection configuration
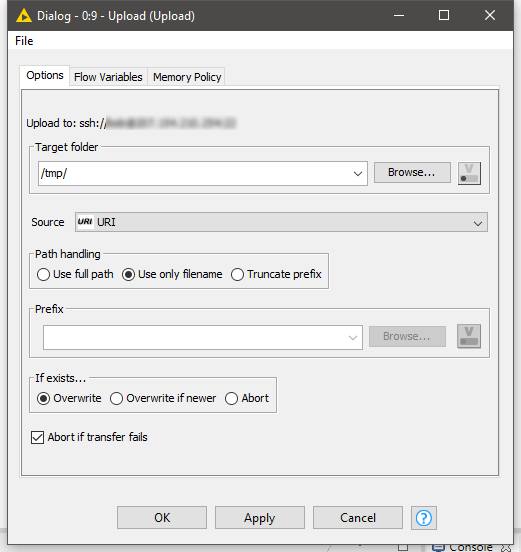
Upload Files 📤
This is where you select the remote location on the server where the files will be uploaded, in my case I’m using the /tmp folder.
KNIME Upload configuration
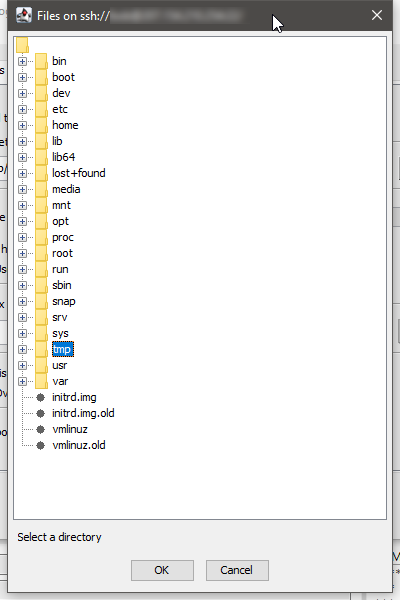
The browse dialog lets you easily select folders on your remove server.
KNIME browsing remote files
That’s all there is. Now you can automatically upload files to your server over a secure connection 🔐