Web Automation Using Python and Selenium

Python automation using Selenium

Selenium is a software library that’s used to automate web browsers. It’s often used to run automated testing but can be used for anything involving a web browser. Since so much software is now running in the cloud and accessible via web interfaces Selenium is ideal for automating lots of manual tasks.

There’s libraries available in many different languages and for many different browsers but for this how-to I’ll be using python and Chrome.

To use Selenium and Chrome you’ll need to download an executable called ChromeDriver and place the file somewhere on your computer. The executable must be used in conjunction with an installed Chrome browser. You need both the Chrome browser and ChromeDriver installed to use Selenium.

1. Download ChromeDriver

Download the file from https://chromedriver.chromium.org/downloads and place somewhere on your computer.

If you save the executable in the same directory as you existing Chrome you don’t need to specify the location in your code, otherwise you’ll need to provide the path to the executable in the code.

The version of ChromeDriver you download must match the version of Chrome you have installed. After downloading just unzip the file and place the executable in your file system.

2. Install Selenium

You can read about Selenium from their site and also read the full Python API docs.

To install simply use pip

pip install selenium

If you’re using Anaconda either use the Anaconda UI or from the conda terminal type:

conda install -c conda-forge selenium

3. Starting a new browser session

The most basic code to start a new session is shown below. Note that here I specify the path to the chromedriver.exe, if you saved it in your Chrome directory this parameter is not required.

from selenium import webdriver
from selenium.webdriver.chrome.options import Options

WIN_DRIVER = "YOUR PATH TO chromedriver.exe"

# control if the browser will be visible (if headless==True then invisible)
HEADLESS = False

# create the options with the HEADLESS variable
chrome_options = Options()
if HEADLESS:
    chrome_options.add_argument("--headless")

# create a new webdriver object passing the options and path to chromedriver.exe
driver = webdriver.Chrome(options=chrome_options, executable_path=WIN_DRIVER)

Breaking this down into more detail this creates a new webdriver object which will opens a blank Chrome browser on the screen. The only import option to pass to begin with is the one to control if the browser will be visible on the screen (headless).

Chromedriver running
Blank Chrome window (note the banner at the top)

4. Navigating to new pages

To load a new web page we use the driver.get() command

driver.get('https://xkcd.com')
Use driver.get(url) to open a web page

5. Locating Elements

Once the browser is running all that’s left to do is actually automate the actions you would like. 99% of this involves reading either reading content from pages or finding and interacting with elements on the page, such as clicking links or selecting check boxes.

Finding element by id is one of the most common and reliable ways to find an element. Here we locate an element with id mylink.

from selenium.webdriver.common.by import By

link_elem =(By.ID, 'mylink')
e = driver.find_element(*link_elem)

If an id isn’t available you can use any of these methods to find an element.

  • ID = “id”
  • XPATH = “xpath”
  • LINK_TEXT = “link text”
  • PARTIAL_LINK_TEXT = “partial link text”
  • NAME = “name”
  • TAG_NAME = “tag name”
  • CLASS_NAME = “class name”
  • CSS_SELECTOR = “css selector”

I won’t cover all the options to locate elements since the official docs do a very thorough job.

6. Interacting with Elements

Reading Attributes

Once you’ve located the element or elements you can then interact with them or read their attributes. For example on the xkcd page first get the Archive link using By.LINK_TEXT and then read it’s href attribute using the get_attribute() method.

from selenium.webdriver.common.by import By

# get the link with text Archive
link_elem =(By.LINK_TEXT, 'Archive')
e = driver.find_element(*link_elem)

# get the href of the link
e.get_attribute('href')

You can also get multiple elements at once using find_elements (note the s on elements). On the xkcd archive page there’s a long list of links to every comic created.

xkcd archive page with links to all comics

To get all these links we can use this code. Broken down we:

  • Wait until an element (‘licenseText’) at the very bottom of the page is located
  • Locate the elements that are in the div with id=’middleContainer’ where the link text contains the word ‘Science’
  • Loop through the list of found elements and create a new list with text, href and title.
# wait for element at bottom of page to be sure it's loaded fully
link_ref = (By.ID, 'licenseText')
e = WebDriverWait(driver, 10).until(EC.presence_of_element_located(link_ref))

# get all links containing the word 'Science'
link_ref = (By.XPATH, "//div[@id='middleContainer']/a[contains(text(), 'Science')]")
e = driver.find_elements(*link_ref)

# create list of tuples with text, href and title
[(a.text,a.get_attribute('href'),a.get_attribute('title')) for a in e]

The output should look like this.

All links containing the word ‘Science’

Clicking and Selecting

If the element can be clicked, like links, buttons, check boxes etc. then simply click them!

e.click()

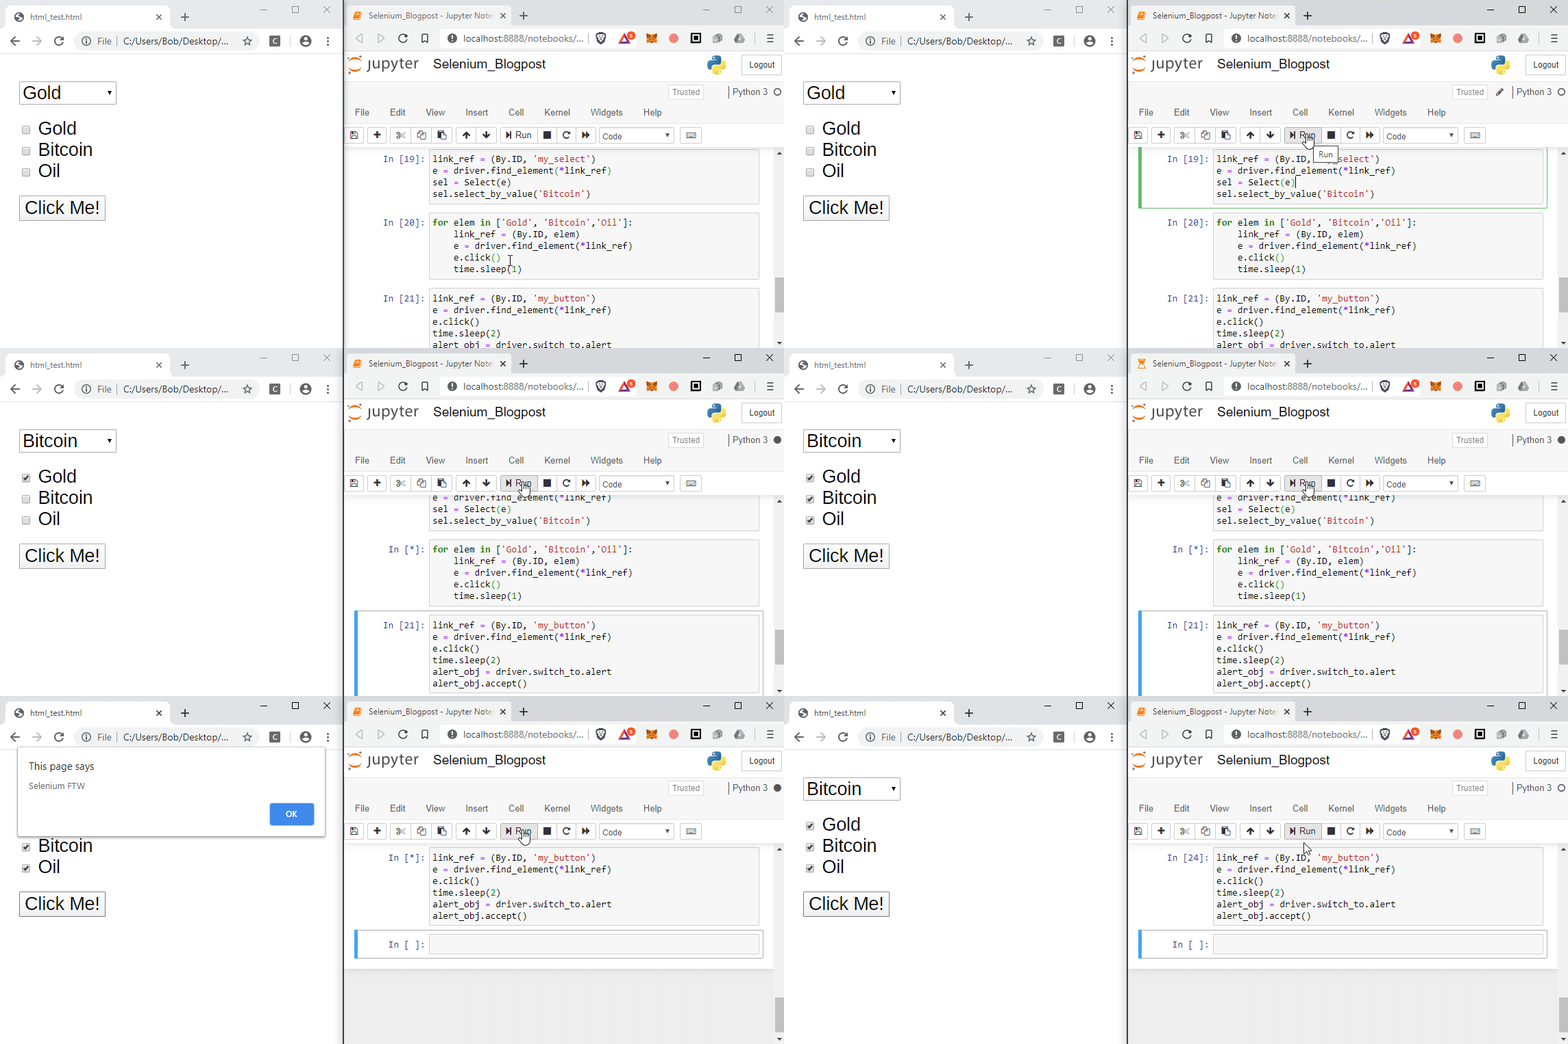
Given a select element that looks like this:

html select
Select drop down

The code below will allow you to change the value in the drop down. You can either change the select using the value (which isn’t visible on the page but you can see in the html), the visible text or by index.

from selenium.webdriver.support.ui import Select

elem_ref = (By.ID, 'my_select')
select = Select(driver.find_element(*elem_ref))

# select value the value
select.select_by_value('4')

# select by the visible text
select.select_by_visible_text('Bitcoin')

# select by position of the element to select
select.select_by_index(1)

6. Exception Handling

The two most common exceptions to catch are when you cannot locate an element on the page or the script times out while waiting to find an element. To catch these we need to import the exception handlers from selenium.

# import the exception handlers
from selenium.common.exceptions import NoSuchElementException, TimeoutException

Catching when you cannot locate an element:

link_elem =(By.ID, 'my_elem')
try:
    e = driver.find_element(*link_elem)
except NoSuchElementException:
    print('Element can't be found')

Catching when the script times out trying to locate an element:

link_ref = (By.ID, 'my_elem')
try:
    e = WebDriverWait(driver, 10).until(EC.presence_of_element_located(link_ref))
except TimeoutException:
    print('Element can't be found')

7. Handling Timeouts and Waits

By default locating elements will run immediately with no built-in delay. This means that if you just loaded a new page you might be trying to locate elements that haven’t yet loaded into the DOM.

To handle this there’s two main options, implicit waits and explicit waits.

Explicit Waits

An explicit wait is where you specify how long to wait before the action should timeout. The script will try to locate the element until the timeout and then throw a TimeoutException which you can catch.

from selenium.webdriver.support.ui import WebDriverWait
from selenium.webdriver.support import expected_conditions as EC
from selenium.common.exceptions import TimeoutException

link_ref = (By.ID, 'licenseText')
try:
    e = WebDriverWait(driver, 10).until(EC.presence_of_element_located(link_ref))
except TimeoutException:
    print('Element can't be found')

Here the script will wait for 10 seconds before timing out.

Implicit Waits

Once set implicit waits are set for every action in the script that follows. This script will wait 10 seconds every time you try to locate an element before throwing an ElementNotfoundException.

# import the exception handler
from selenium.common.exceptions import NoSuchElementException
# set the implicit wait here
driver.implicitly_wait(10)

driver.get("http://a_slow_page.com")
try:
    e = driver.find_element_by_id("my_element")
except NoSuchElementException:
    print('Element can't be found')

8. Alerts (Popups)

Browser popup dialog

If the page generates a browser alert or popup box you can also interact with these using Selenium. To get the alert use:

alert_obj = driver.switch_to.alert

To read the message in the alert use:

alert_obj.text

To accept, dismiss the alert use:

# to accept the default
alert_obj.accept()

# to cancel
alert_obj.dismiss() 

9. Closing the Browser

When you’ve done with your browser session it’s good to clean up after yourself. Close the browser session when done with:

driver.quit()

Help Locating Elements

On Chrome the Developer Tools (press Ctrl+Shift+i) are a huge help in location elements and getting their, Id’s, name or XPath. The image below shows how to access and copy the XPath of an element.
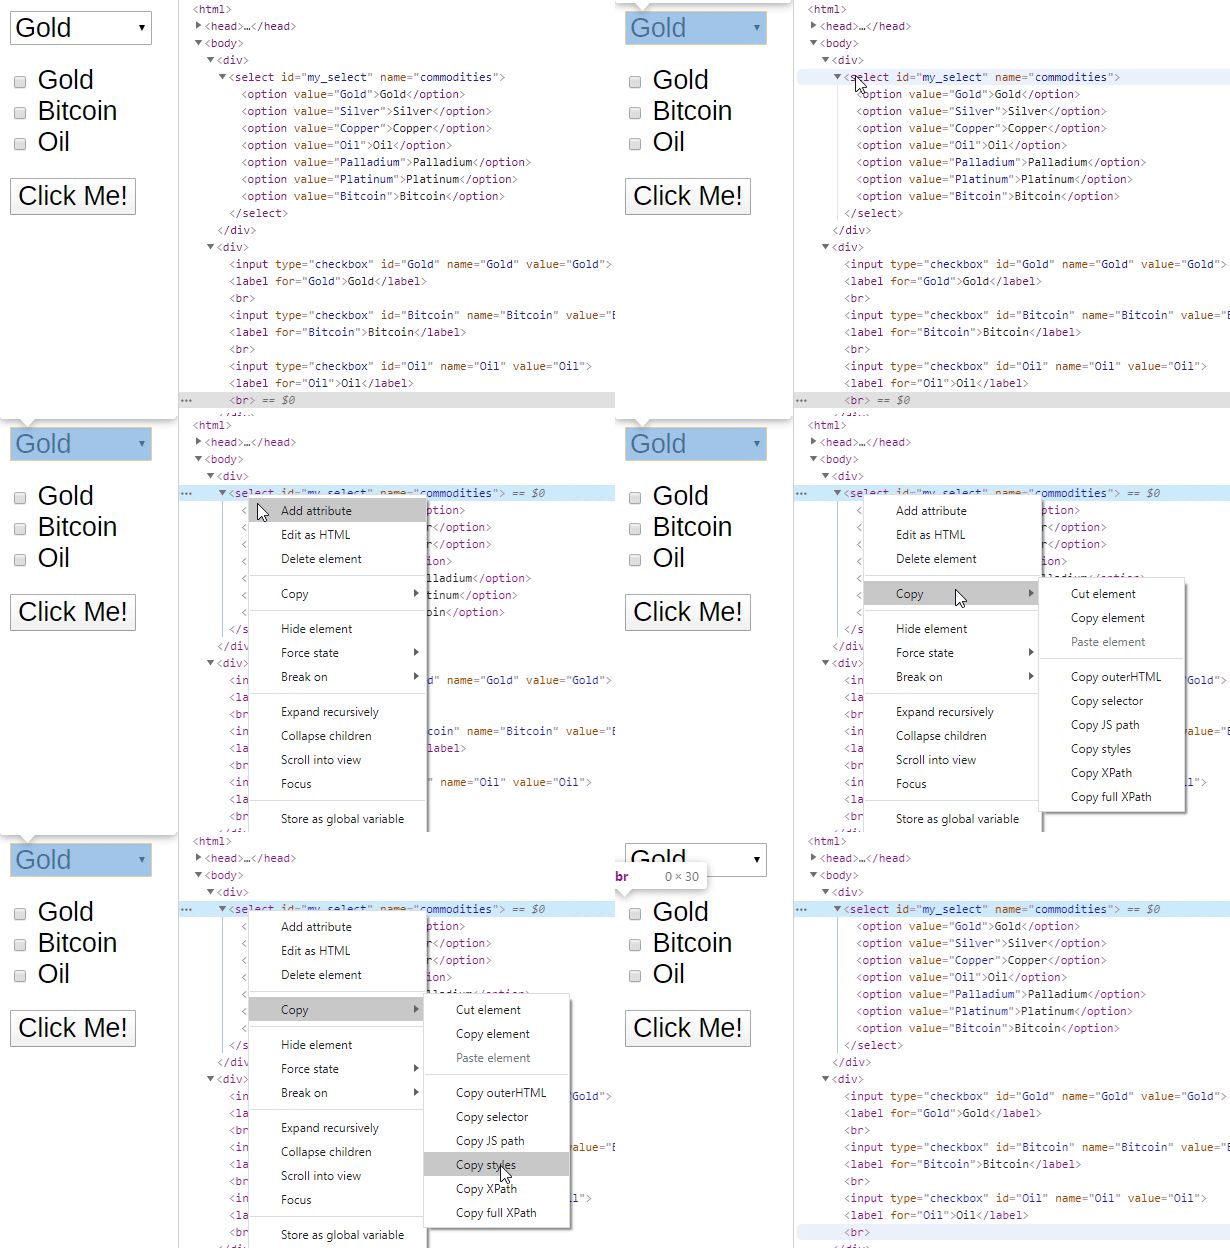
Use Chrome’s Inspector to get the XPath of elements

Resources

The jupyter-notebook example using xkcd can be downloaded from my GitHub repository.

Multi-threading API Requests in Python

Speeding up python using multi-threading

When making hundred or thousands of API calls things can quickly get really slow in a single threaded application.

No matter how well your own code runs you’ll be limited by network latency and response time of the remote server. Making 10 calls with a 1 second response is maybe OK but now try 1000. Not so fun.

For a recent project I needed to make almost 50.000 API calls and the script was taking hours to complete. Now looking into multi-threading applications was no longer an option, it was required.

Classic Single Threaded Code

This is the boilerplate way to make an API request and save the contents as a file. The code simply loops through a list of URLs to call and downloads each one as a JSON file giving it a unique name.

import requests
import uuid
url_list = ['url1', 'url2']
for url in url_list:
    html = requests.get(url, stream=True)
    file_name = uuid.uuid1()
    open(f'{file_name}.json', 'wb').write(html.content)

Multi Threaded Code

For comparison here is the same code running multi-threaded.

import requests
import uuid
from concurrent.futures import ThreadPoolExecutor, as_completed

url_list = ['url1', 'url2']

def download_file(url, file_name):
    try:
        html = requests.get(url, stream=True)
        open(f'{file_name}.json', 'wb').write(html.content)
        return html.status_code
    except requests.exceptions.RequestException as e:
       return e

def runner():
    threads= []
    with ThreadPoolExecutor(max_workers=20) as executor:
        for url in url_list:
            file_name = uuid.uuid1()
            threads.append(executor.submit(download_file, url, file_name))
           
        for task in as_completed(threads):
            print(task.result()) 
      
runner()

Breaking it down you first need to import ThreadPoolExecutor and as_completed from concurrent.futures. This is a built-in python library so no need to install anything here.

Next you must encapsulate you downloading code into its own function. The function download_file does this in the above example, this is called with the URL to download and a file name to use when saving the downloaded contents.

The main part comes in the runner() function. First create an empty list of threads.

threads = []

Then create your pool of threads with your chosen number of workers (threads). This number is up to you but for most APIs I would not go crazy here otherwise you risk being blocked by the server. For me 10 to 20 works well.

 with ThreadPoolExecutor(max_workers=20) as executor:

Next loop through your URL list and append a new thread as shown below. Here it’s clear why you need to encapsulate your download code into a function since the first argument is the name of the function you wish to run in a new thread. The arguments after that are the arguments being passed to the download function.

You can think of this as making multiple copies or forks of the downloading function and then running each one in parallel in different threads.

threads.append(executor.submit(download_file, url, file_name)

Finally we print out the return value from each thread (in this case we returned the status code fro the API call)

for task in as_completed(processes):
        print(task.result())

That’s it. Easy to implement and gives a huge speedup. In my case I ended up with this performance.

Time taken: 1357 seconds (22 minutes)
49980 files
1.03 Gb

This works out at almost 37 files a second or 2209 files per minute. This is at least a 10x improvement in performance.

The full python docs are here, https://docs.python.org/3/library/concurrent.futures.html

Using Python with One Time Passwords (2FA)

Ever wanted to automate a process involving a vendor website and come across this. Me too πŸ˜”

Secure..but annoying to automate

One time passwords (aka MFA, 2FA, or two factor authentication as I’ll say from here on) are something everyone should use and are great for security, not so great for automation.

Until recently I thought this was hard to overcome without some super hacky solution but if you’re using selenium with python the solution is at hand and really easy to implement.

This solution works if you’re using an authenticator app like Google Authenticator that generates time based tokens that change every 60 seconds (which I recommend over SMS due to the sim swap security issue).

Using pyotp

The pyotp library handles creating new one time tokens. To enable the creating of new tokens we must know the secret key that we use when initially setting up the OTP.

When enabling 2FA you are usually prompted to scan a QR code. In reality this is simply a convenient way to enter the secret πŸ”‘, since the code is just the secret key encoded as a QR code.

As well as the QR code there’s always an option to enter the key manually, use this option and copy the key to a secure location. The key will usually be a long string of letters and numbers like E7XCRPCJABXKM575P3EIVNKYVG3DBRZD.

Note that if someone else gets your secret πŸ”‘ they will also be able to generate your tokens so please look after them!

Authenticator apps like Google Authenticator work offline by generating tokens based on the secret key and a time stamp. Using the same πŸ”‘ we can generate the same tokens in python.

The Code

First import the library and initialise with your secret πŸ”‘

from pyotp import *
# initialise with your secret key
totp = TOTP("E7XCRPCJABXKM575P3EIVNKYVG3DBRZD")

When you want to create a token simply call this function.

token = totp.now()

Now you can use the send_keys function in selenium to populate the 2FA field in the web application.

# find OTP element on page and send token
e = driver.find_elements(By.ID, "auth-mfa-otpcode"))
e.send_keys(token)

Testing

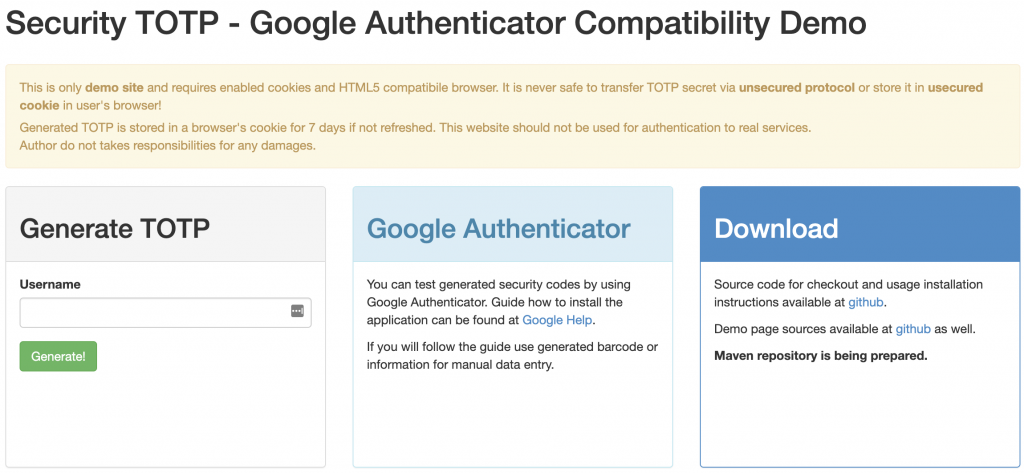
To test the tokens are working you can use the site below. Type anything as the username and it will give you the secret πŸ”‘ to use in your script.

Token test site

Integrations

This solution could also be integrated into other applications by either embedded a small python script into the flow (using Alteryx or KNIME for example) or alternatively by creating a private API using Flask so any application supporting APIs can simply get the token via a simple API call.

You can now access any site protected by 2FA πŸš€

Do What I Mean!

DWIM (do what I mean) computer systems attempt to anticipate what users intend to do, correcting trivial errors automatically rather than blindly executing users’ explicit but potentially incorrect inputs.

https://en.wikipedia.org/wiki/DWIM

When I hear about the AI singularity and how no one will have jobs in 10 years I usually just laugh.

Computers and software are really, really dumb.

Consider this, I’m using a terminal on my computer (Windows, Mac, Linux, doesn’t matter).

I’m in my home directory and want to change directory to Documents, but mistype.

C:\Users\Me>cd Document
The system cannot find the path specified.

How dumb is this? Any human would immediately see the error and know you meant to access the Documents directory. But computers are dumb. They do what you tell them, not what what you want. Blindly following rules.

We are a million miles from telling computers what result we want and letting them work out for themselves how to get the answer. Imagine if humans worked like this. I’d never ask my daughter to empty the dishwasher because explaining her all the steps involved in the process would take 100x longer than just doing it myself!

We need result based computing, not process based computing.

Two classic programmer jokes highlight the issue. Humans would never do this but computers do it every day.

My wife said: “Please go to the store and buy a carton of milk and if they have eggs, get six.” I came back with 6 cartons of milk She said, “why in the hell did you buy six cartons of milk”

“They had eggs”

and

A programmer goes out to get some dry cleaning. His wife told him, “While you’re out, pick up some milk”

He never came home

Daily Examples of Dumb Errors

UiPath

Maybe I mean intMyNum…

Alteryx

Yes I know

Tableau

You think?

LibreOffice Calc

DAYSINMONTH

Python

You have a point

MacOS

I’m scheduled to meet unknownorganizer@calendar.google.com

The last message from the ‘Today’ panel on my MacBook is very telling. It’s clear that underlying all the smart AI is still lots of rules-based logic. This is if-then-else login, not AI.

  • Look in calendar for events in the next 24 hours
  • Parse events and turn into human friendly string
  • Use ‘from’ field as the person you’re about to meet
  • Fail

My computer has no idea ‘unknownorganizer’ isn’t a person, it doesn’t know how names work or what constitutes a name. It’s just a dumb parser.

While we read stories everyday about facial recognition or predicting flu outbreaks (although we’re a long way from predicting COVID 19 and Google Flu Trends shut down a long time ago due to inaccuracy) AI is still in it’s infancy and trying to do anything that we might call General AI is still a long way off.

The potential to make everyday software so much smarter is there, but I see very little focus on this type of work despite the idea being around for at least 60 years. The productivity gains could be huge but it seems something seemingly as simple as doing what we want is still too complex for computers to achieve.

Why are Logistics Carriers so Bad with Data?

Just to be clear when I say Logistic Carriers I mean UPS, DHL, DSV, GLS and many other three letter companies that deliver your Christmas presents, but in a business context they are also responsible for B2B deliveries of goods to shops and warehouses.

I’ve previously worked in Logistics for many years and so have some insight into integrations with Logistic Carriers and the picture is not pretty.

Now I’m working in consultancy and it’s my task to gather invoices from different carrier, process the data and present it in the form of an interactive dashboard.

Sounds easy, just use APIs to get the data, clean, reshape and present. If only πŸ™„

First up no carriers offers APIs for invoicing data. Unbelievable I know. They have APIs for tracking, label printing, updating shipping info, rate calculations, everything else but not invoicing. You have to log in to a web portal, search, select your files and download. Welcome to 1995.

It gets worse from there.

UPS

  • Provides PDF or CSV files πŸ‘
  • The CSV has 250 columns!
  • The services are provided as row items so to process data you need to pivot as one package can have many services applied
  • There are 70 different service charges!!!!
  • The service charges appear in the local language as plain text with no service codes making joining multiple files a nightmare
  • Dimensions appear as text fields like 24.0X 12.0X 8.0. Thank god for regexes.
  • Weights and quantities only appear on lines associated with actual freight costs
  • Sometimes data is just missing, orders, tracking numbers, sender, you name it.

Royal Mail

  • Provides CSV files that looks to be sourced from the original PDF
  • CSV files contain a totals row and subtotals along with other extra lines 😬
  • Charges are split across multiple lines (since the PDF does the same)
  • PDF has extra line charges not included in the CSV
  • If you download a single CSV file it’s delimited with a pipe ( | ) but if you download multiple files you get a consolidated file that’s comma delimited 😲
  • Developer site appears to be permanently down (at least it has been for the last two weeks)

DSV

  • Excel files available πŸ‘ but they look exactly like you’d expect a PDF invoice to look like 🀯
  • Excel files are still in xls format (the newer xlsx format was introduced in 2007, 13 years ago, this gives you an insight into their systems)
  • Only contains monetary values, no tracking info, no quantities of packages, individual weights etc.
  • Every line item is a summary line that’s immediately duplicated as a sub-total underneath
  • Random cells are merged and formatting makes reading data very challenging
  • Basically they’ve designed an invoice in Excel that generates the PDF they wish to send to their customers

On a side note I recently saw a job advertisement for DSV that specifically asks for strong Excel and VBA skills. Job descriptions are a great way to get an insight into a company and their systems.

What should have been a straightforward integration and data presentation exercise has tuned into a complex workflow requiring web automation, file conversion and extensive data cleaning before we can even start to look at the data.

Environmental Considerations

Moving forward companies will also have an increased demand from their investors to measure and set targets for CO2 emissions.

As things stand today most companies don’t know how their products get from A to B since the carriers are left to optimize their distributions for cost/deadlines with little consideration for the environment. Expect this to change. They will need to offer ‘Least impact’ options to customers and also provide the data to enable companies to report on their distribution environmental impact.

On the parcel tracking side there’s been lots of startup activity creating aggregators that act as a single source of data. Maybe we need that for invoicing as well πŸ€”

Loading Private Python Libraries to Alteryx at Runtime

The python tool in Alteryx is a great resource that I often use but it can easily get very cluttered with lots of reusable code that could easily be moved out and imported as a library.

Unfortunately by default you can’t just use the standard import statement since the location of your workflow at runtime is not in pythons path so it doesn’t search for libraries there.

Take this example where I have a python file called carrierpy.py located in the same directory as my Alteryx workflow. The file contains a simple function to return the dates for the start and end of the previous two week period.

import datetime
def last_week():
    today = datetime.datetime.today()
    weekday = today.weekday()
    start_delta = datetime.timedelta(days=weekday, weeks=2)
    start_of_week = today - start_delta
    end_of_week = start_of_week + datetime.timedelta(days=13)
    return (start_of_week, end_of_week)

If you try to load this library from the python tool in Alteryx (import carrierpy as cr) you’ll see this error. The python tool cannot find the library as it’s not searching the current workflow path.

Module not found

Standard ways to access the current working directory also cannot be used as they return the path to the temp location used by the Jupyter notebook, not the directory the Alteryx workflow is saved in.

Workflow Constant Solution

To allow this to work we need to use the Alteryx module that we import at the start of every python tool.

In the python tool add the following code at top of the notebook to read the current path from the Alteryx library and add this to to sys.path. Then we can load modules from the local directory without issues.

from ayx import Alteryx
import pandas as pd
import sys

# get the path of the Workflow Directory
path = Alteryx.getWorkflowConstant('Engine.WorkflowDirectory')

# append this path to the python sys.path
sys.path.append(path)

# import from current directory
import carrierpy as cr

dates = cr.last_week()
  
# initialise data of lists. 
data = {'Date':[dates[0]]} 
  
# Create DataFrame 
df = pd.DataFrame(data) 
Alteryx.write(df,1)

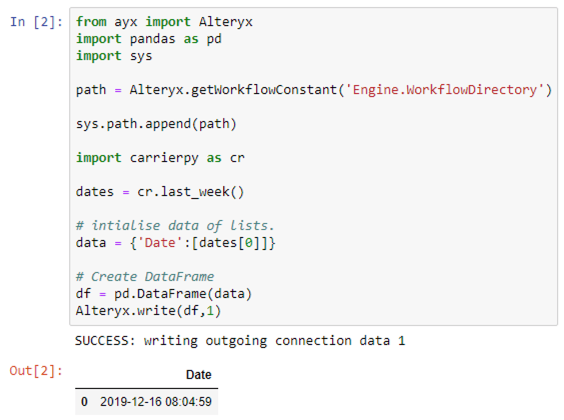
Sure enough this works and if we run the Jupyter notebook we see the correct data printed (make sure you run the entire workflow first otherwise the input path will not be populated and cached).

In the Alteryx workflow messages we now see the data is correctly passed out of the python tool.

Successful output

The browse tool also shows the date being output from the python tool 🐍

Correct date output into workflow

Now you can create your own libraries of often used python functions and import them into your workflows as required ♻️

Converting xls to xlsx files in Alteryx

There are numerous threads on the Alteryx Community where people are asking how to covert xls files to xlsx. The solutions generally suggest one of two approaches, either

  • Read the file in with an Input Data tool then output again in the new format
  • Use the Run Command tool to use an an Excel component to do the conversion

In my (admittedly edge!) case the server doesn’t have Excel installed and I don’t want to pay for a license just for this. Plus the file cannot be read natively by the input tool as it requires pre-processing in python first (it’s a really weird Excel file that looks like an PDF invoice but in Excel 😬)

LibreOffice Batch Converting

My solution is to use LibreOffice. It’s open source, free to use and includes batch conversions that can be run from the command line. By default the UI will not be shown when run in this way.

The basic command to do the conversion is shown below.

"C:\Program Files\LibreOffice\program\soffice.exe" --convert-to xlsx "C:\input_path\file.xls" -outdir "C:\output_path"

–convert-to xlsx should be followed by the name of the xls file to convert and the -outdir will be used to write the xlsx files to. The files will have the same name as the original just with the new extension.

Integrating this into an Alteryx workflow is just like any other using the Run Command to run an external program.

  • Use a Directory tool to read all the xls files
  • A Formula tool to create the command line for each file
  • A Run Command to first write the flow to a batch file and then run the file

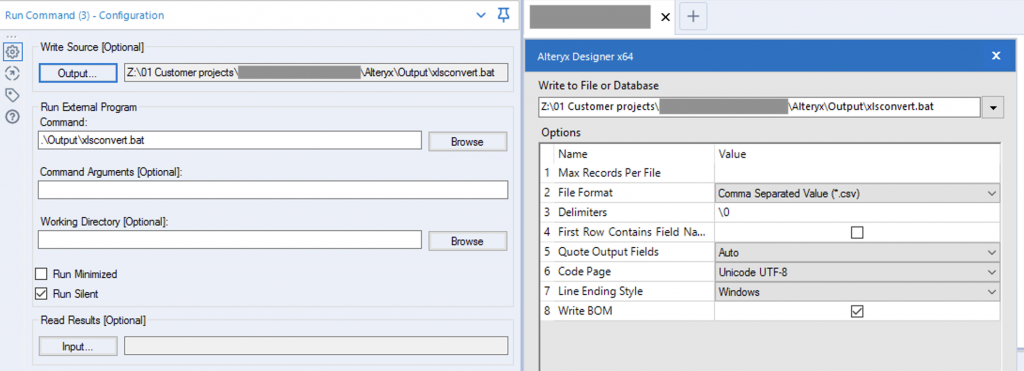
The most difficult part is configuring the Run Command. The configuration should look like below so the flow is first written to a file ending with .bat followed by the tool running this newly created batch file.

The xlsconvert.bat file that is created should look something like this with a line per conversion.

"C:\Program Files\LibreOffice\program\soffice.exe" --convert-to xlsx "C:\Customer projects\Project\Alteryx\Data\Invoice - SBRY0191928.XLS" -outdir "C:\Customer projects\Project\Alteryx\Data\"
"C:\Program Files\LibreOffice\program\soffice.exe" --convert-to xlsx "C:\Customer projects\Project\Alteryx\Data\Invoice - SBRY0192237.XLS" -outdir "C:\Customer projects\Project\Alteryx\Data\"
"C:\Program Files\LibreOffice\program\soffice.exe" --convert-to xlsx "C:\Customer projects\Project\Alteryx\Data\Invoice - SBRY0192914.XLS" -outdir "C:\Customer projects\Project\Alteryx\Data\"
...

Each file will be processed turn and written to the -outdir you specified in the formula tool. VoilΓ .

Converted files together with original

Conversion Using the Python Tool

If you prefer to use python instead of the run command tool it’s very easy to run the same command. This code will run LibreOffice in headless mode again and silently convert the files from xls to xlsx format.

The only import required is subprocess which is already available to Alteryx in the default install.

from ayx import Alteryx
import subprocess
import os
import pandas as pd

# prepare outbound data
data = {"Files":[]}

# path with files to convert (assume in Data subdirectory to workflow)
PATH = Alteryx.getWorkflowConstant('Engine.WorkflowDirectory') + "Data"

# path to LibreOffice your executable
EXE = 'C:\Program Files\LibreOffice\program\soffice.exe'

# loop files, convert and get converted filename for outputting
for file in os.listdir(PATH):
    if file.lower().endswith("xls"):
        subprocess.run([EXE, '--convert-to','xlsx',os.path.join(PATH, file),'-outdir',PATH])
        filename, file_extension = os.path.splitext(file)
        data['Files'].append(os.path.join(PATH, filename, file_extension.lower().replace("xls", "xlsx")))

Alteryx.write(pd.DataFrame(data),1)

I personally prefer the python method over the run command purely because I find it more flexible and easier to set up but it works the same either way.

You could of course also use this method for any other Analytics platform such as KNIME, it could also be integrated into an RPA solution using UiPath or similar tool.

Jupyter Notebook Shortcut on MacOS using Anaconda

It’s not immediately clear on Mac OS how to start a Jupyter Notebook if you’re using Anaconda.

The actual executable is located at /Users/*YOURUSER*/opt/anaconda3/bin/jupyter-notebook but it can be a pain to either type the full link or even worse start the Anaconda application first just to open a notebook.

The easiest way I found is to make a symlink in your /usr/local/bin directory (make one if it doesn’t already exist) using the following command.

$ cd /usr/local/bin
$ ln -s /Users/*YOURUSER*/opt/anaconda3/bin/jupyter-notebook 

Then you can start jupyter-notebook from anywhere in the terminal by just typing jupyter-notebook.

Alternative Method

I had to use the above solution since conda was not in my path but it seems there’s another solution that’s even simpler. Just open a terminal, navigate to your anaconda installation and run the conda with the following arguements.

$ cd opt/anaconda3/bin
$ ./conda init zsh 

Brew Permissions Error

I recently installed Homebrew on my MacBook and immediately hit permissions issues (I’m running Catalina v 10.15.2 (19C57) and it seems permissions are an issue for many apps).

Trying to install wget gave this error.

Last login: Wed Nov 20 08:55:40 on ttys000
bob@Bobs-MacBook-Pro ~ % wget https://creativedata.stream
zsh: command not found: wget
bob@Bobs-MacBook-Pro ~ % brew install wget
warning: unable to access '/Users/bob/.config/git/attributes': Permission denied

If you look at the permissions on the .config folder you immediately see the problem.

bob@Bobs-MacBook-Pro ~ % ls -la|grep .config
total 72
drwx------ 3 root staff 96 Nov 3 19:44 .config

By default it’s owned by root and my user has no permissions set. The fix is simple, change the owner to your user and give 744 permissions (must be run as sudo). Problem solved 😎

bob@Bobs-MacBook-Pro ~ % sudo chown -R bob:staff .config
Password:
bob@Bobs-MacBook-Pro ~ % sudo chmod -R 744 .config

The Knowledge Curve

Having recently changed jobs to become a Consultant after working 15 years in the Retail Industry I think about this chart a lot.

I’m personally at a stage where I think I know quite a bit but I’m mostly overwhelmed by how much more there is to know 🀯

I also need to become more comfortable with the fact keeping up with new technologies is almost hopeless, but is also not required.

With age and experience you realise the actual technology matters less than you think, what really matters are general techniques to solve problems, ways of isolating issues, seeing the big picture in your head and so on.

In other words you build mental models of how things work and apply that to problem solving. Things that only come with age and experience.